Hypershot - Photography Portfolio WordPress Theme
Documentation
- created: 11/08/2012
- latest update: 09/20/2013
- by: Apollo13
- email: info@apollo13.eu
Thank you for purchasing our theme. In case of any questions or doubts, do not hesitate to contact us via our Support Forum: http://support.apollo13.eu/. We will do our best to solve any problem concerning the project. At the same time we invite you to visit often our profile on ThemeForest since there will be appearing the improvements of our project and the newest actualizations.
You have probably seen our demo page and this is why you baught this theme. To see most of this things in your page you will have to provide proper content for it, and here we will guide you how to achieve this.
Inserting images in theme
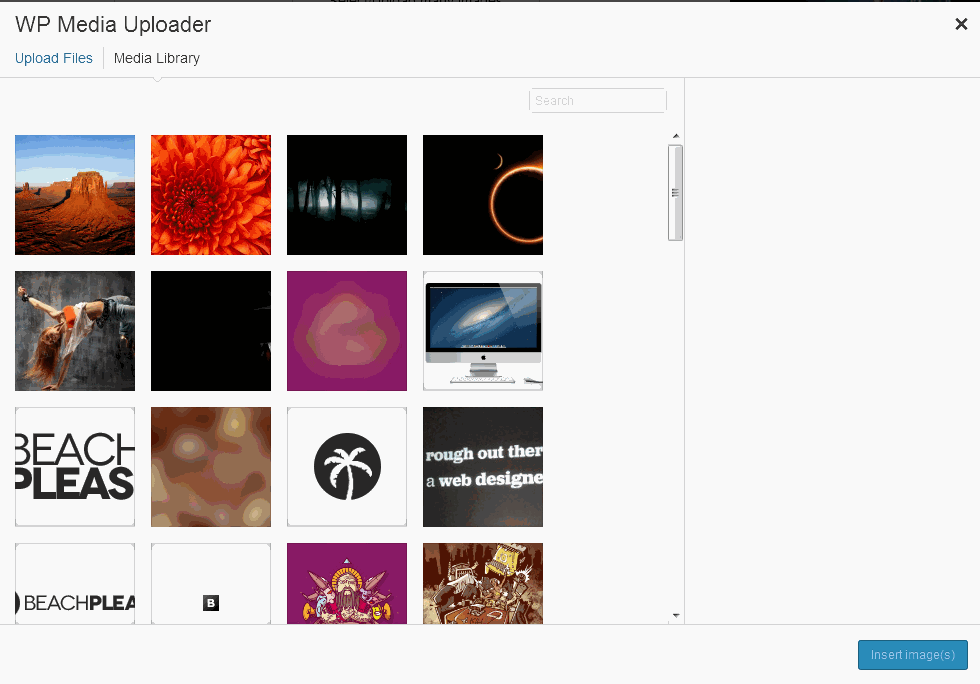
Every time you upload some image in settings(for logo, background) or in post/pages/albums if you want to use exactly same image as uploaded, then use Full Size option(screen shot). Other options will be available depending on image size you have just uploaded.

My front page is empty or gives error message.
If you see empty front page after theme installation or message "Apologies, but no results were found for the requested archive. " it means you have to add some content or change front page to display something else.
You will have to add some posts/page or add some albums and albums page. Next follow this section.
I would like to see front page same as on your demo. How to do it?
Our front page is Albums list page. Firstly you need to add some albums and albums page. Next select Albums list in this section.
Check this section.
How to make album to show in background of post/page ?
First you have to have some album. Next you will have to set it as background in posts/page options. Check this section.
What are best practices while adding photos to album?
Especially for you we prepared Album appearance section.
I would like to modificate theme, how can I do it?
If you like to edit some CSS and JS, or maybe some theme behaviour you should check compression options and theme modification section.
Since version 1.4 we have removed compressed scripts and styles. These were very good things if you won't make any changes in theme. In other case it was counter intuitive, when editing for example style.css made no changes in site.
We decided that such behaviour(compressing CSS & JS) should be user choice made by installing plugin.
If you choose any plugin for that please test it with theme before trusting it completely:-)
Are there any recommendations of plugins from us? Not yet. We have tested some plugins and none is good enough in our opinion, as many just do too much. We are waiting for your opinions in that field:-)
Since version 1.3 we have changed back end media selector to one intrduced in Wordpress 3.5. You can now use it for albums or for adding logo:-)
Twitter widget
Also cause of change in API and policy of twitter we had to remove Twitter widget from our theme as it was no longer usable. Instead we recommend to use http://bluedogwebservices.com/wordpress-plugin/twitter-widget-pro/
To use you will have to provide twitter account info as explained in plugin instructions.
Install
To install theme you can:
- Upload it via FTP(safer)
- Download ZIP file from ThemeForest and find in it hypershot.zip(theme file)
- Unpack files from hypershot.zip. You should now have directory hypershot and in it othere directories and files like 404.php, home.php, index.php etc.
- upload whole hypershot folder to /wp-content/themes/ in your wordpress installation
- login to admin panel in Wordpress, and go to Appearance->Themes and click Activate below hypershot theme
- Upload it via admin panel(can get error while upload)
- Download ZIP file from ThemeForest and find in it hypershot.zip(theme file)
- go to Appearance->Themes->Install Themes(Tab)->Upload and choose file hypershot.zip
- go to Appearance->Themes and click "Activate" below hypershot theme
After that you will see new menu named Hypershot Theme and that is where all fun begins :-) Also you will see My albums. We will write about it later.
After installation
Set permalinks
It is good practice to set permalinks for your blog. Go to Settings->Permalinks and set anything other then default seetings.
Social Plugin
If you wish to use social options for albums then you should install AddThis Social Bookmarking Widget
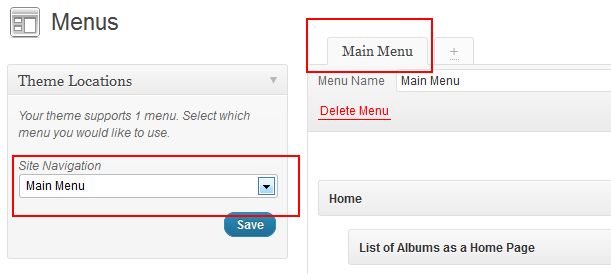
Add menu
Next you should choose menu to use in theme. It is very simple. Go to Appearance->Menus, create some menu(even with one position) and select available menu in Theme locations-> Site Navigation. Read more about creating wordpress menu.
There is also place for other menu, Footer short menu. As name suggest it should be as short as possible, for two max 3 short links like Faq, help, Sitemap etc.
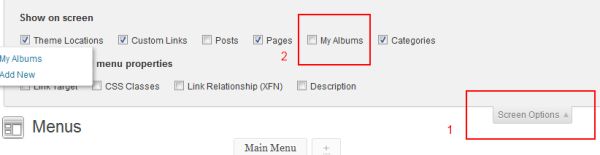
If you want to add Single Album to menu you have to digg in wordpress hidden options;-). Just look at image below
Next you should scan through Theme options to set everything you need.
Update theme
As this theme is commercial one, for now we don't provide autoupdate option for theme, as this will lead to easily stealing our theme . In future this may change, but for now updates are only available on ThemeForest in place where you have downloaded your first version of theme:-) Although wordpress will inform you about new version of theme, trying to use autoupdate for this theme will end up with error.
When you got zip file with theme, best way to update theme is to use plugin such as http://wordpress.org/extend/plugins/easy-theme-and-plugin-upgrades/. You can also manualy delete theme and upload new version. If you have made some changes in theme files you will have to manualy update to keep your changes.
Remember to always backup your data before update!(or cry if you didn't and something went totally wrong)
Use of Easy Theme and Plugin Upgrades
Upgrading a Theme(copied form plugin page)
- Download the latest zip file for your theme.
- Log into your WordPress site.
- Go to Appearance > Themes.
- Click the "Install Themes" tab.
- Click the Upload link below the main page tabs.
- Select the zip file with the new theme version to install.
- Select "Yes" from the "Upgrade existing theme?" option.
- Click "Install Now".
After update you will loose file user.css which holds some settings from admin panel. Don't panic :-) Just go to admin panel to menu named Hypershot Theme, change first option you see, even if only by a pixel ;-) click Save changes and it will recreate this file. Now you can revert your changes.
Demo data
If you really need to see your new site as our demo page, then this is section for you. This is why we provide sample data, if you like to see how it is all made from backend in admin page. If you are confused about options in theme, we advice to use it only to see how things are made in Hypershot. After that, you should clean your Wordpress so you don't have any unwanted content ;-)
How to install sample data:
- Locate the sample_data.xml file in data folder in file downloaded form ThemeForest
- Open Tools->Import menu and choose WordPress option(Installation may be needed first).
- Upload sample_data.xml file.
- On next page you should check Download and import file attachments
But it would be simple if this will end here :-) Import will probably fail(cause of timeout while downloading images), so you will have to repeat above steps few times, till you get success message. After this fallow next steps:
- Go to Settings->Reading->A static page
- As Front page use Albums, as Posts page use Blog and save
- Go to Hypershot theme->Main settings->What to show on front page? set to Albums list
- Go to Appearance->Menus->Theme locations-> Site Navigation select available menu(adding menu).
- You may need to clean menu listed on the right couse it may have 'doubles' due to many import atempts.
- Widgets will be totaly no good, so go to Appearance->Widgets and make some cleaning and inserting.
- Last thing we have to create user.css file from default settings. To do that, we have to edit any setting of theme. Go to Hypershot theme->Albums->Select start album and select "Mixed". But for real, you can change any option of theme to recreate user.css file.
- Theme should look good enough now.
If you wish to use theme default value for each option(it may sometimes be different frome theme initial value) just delete whole text in input from this option.
What to show on front page?
Here you set what you wish to see on frontpage. You can choose from:
- page - static page added in Pages menu,
- post list(blog) - it is default wordpress front page,
- albums list - list of all albums you have displayed as full width slider,
- single album - one album, showing full screen photos
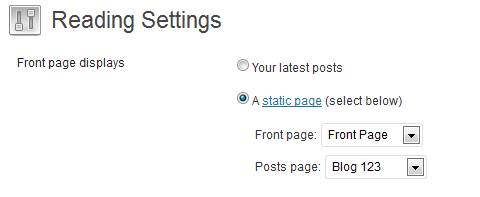
For proper work of theme you should define front-page and blog page:
- Go to Settings->Reading->A static page
- as Front page set some empty page you created in Pages menu, for example you can name it "Frontpage"
- as Posts page use another empty page named for exapmle "Blog".
Select start album
If as front page you choose Selected album then here you can select this album.
Info above header
Module in which you can add some HTML. It can be description about your site, or map how to get to you, or maybe info that you are away for holiday:-) Note: If you use here <iframe> map from google it may cause crush of browser on older IOS devices.
Footer text
Text that will appear in footer. Copyright text will appear on the left, you can use html in field(good to link something).
Contact form settings
Give e-mail address for contact page form or left empty to use admin e-mail.
Google Analytics
Code for statistics from google
In theme we use shortcodes editor. You can see it below:
Use it to insert predefined elements for your content. To see available shortcodes in theme check http://themes.apollo13.eu/hypershot/shortcodes/ and select shortcode category from submenu.
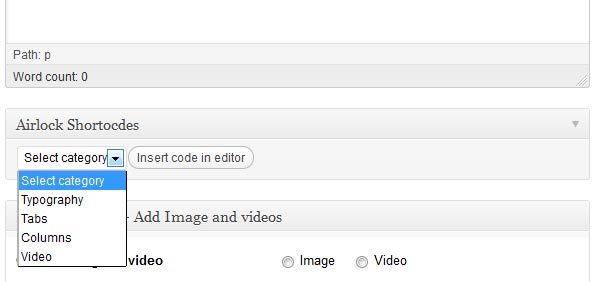
You can also use wordpress embeds. Just select emebeds from shortcode menu, and insert your link for embed.
To make frontpage and Blog work as it should you have to follow this steps:
- Go to your wordpress Pages->Add new
- Add new page named Frontpage and another named Blog. You can leave them empty.
- Go to Settings->Reading->Front page displays
- Choose "A static page (select below)"
- In Front page: choose Frontpage
- In Posts page: choose Blog
- Save changes.
- You are done :-)
Next go to Main settings menu
Pages has almost same options so this description will fit them too
If you are not familiar with adding posts in wordpress please read http://codex.wordpress.org/Writing_Posts
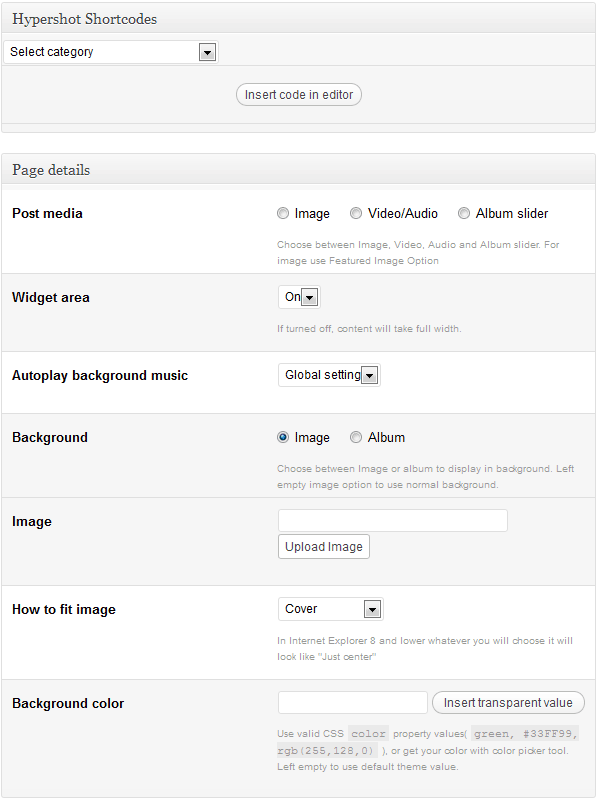
Adding posts is same as always in wordpress, but with few tweaks. Firstly you can use shortcodes editor. Secondly you use Featured image, Video/Audio or Album slider to represent post.
Also you can choose to use full width content by turning off Widget area.
Last thing is setting backgorund image or background album. To do it select in Background option Image or Album and next select desired image or album to display.
Posts list / blog
If in Blog & Archives menu Type of post excerpts is set to Auto, then If while writing posts you won't use more tag then theme will use excerpt feature. Excerpt are made automatically, but you can also specify what will be displayed. Just find Excerpt box, and type text you wish Read more.
If you won't give excerpt either, then post will be cut after first 30 words.
Before you start anything below, it is good to visit Albums menu
Adding Albums list
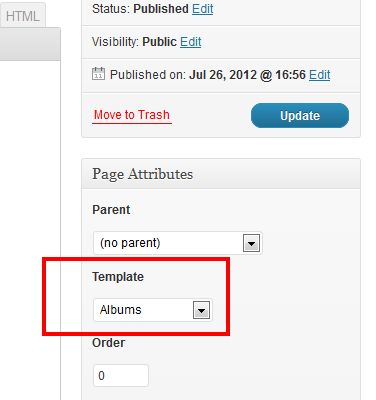
To add Albums list to your blog first you need to create Albums list page:
- Add new page(Pages->Add new)
- Name it as you wish but keep in mind that if you use nice addresses (eg. yourblog.com/about-me ) than slug of your page have to be different then slug for portfolio setted in Albums menu, so everything will work correct. Best name this page as "Albums Page".

- From template list choose Albums.
- Publish Page.
- Done
Add new album
Adding new album is pretty easy. First you should set title and Featured image as it is cover of your album which is visible on Albums list page.
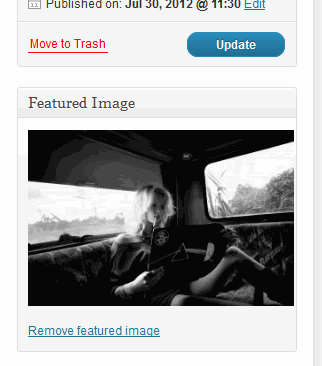
Important thing here is to keep cover of album in rational dimensions, as image for album cover is loaded in full version(same image as uploaded) and uploading here 10MB file could kill user transfer when viewing Albums list page. And what would happen if you would have 20 albums... :-)
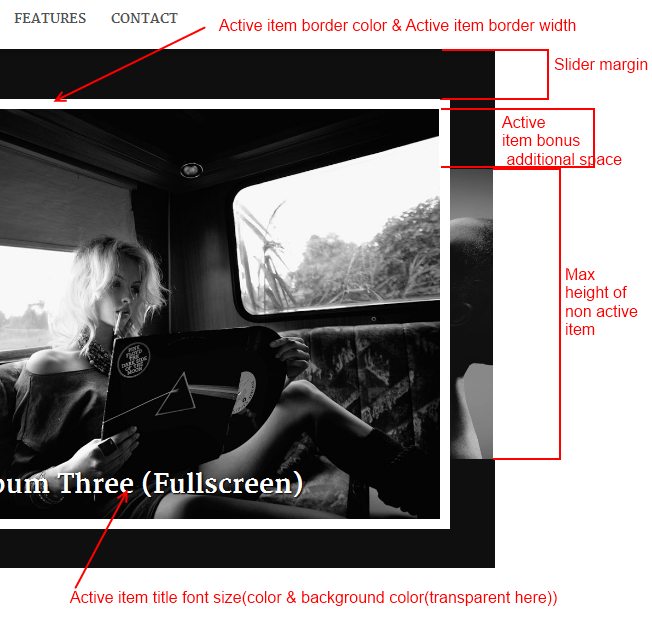
Next you have to set some settings. Lets check image below.
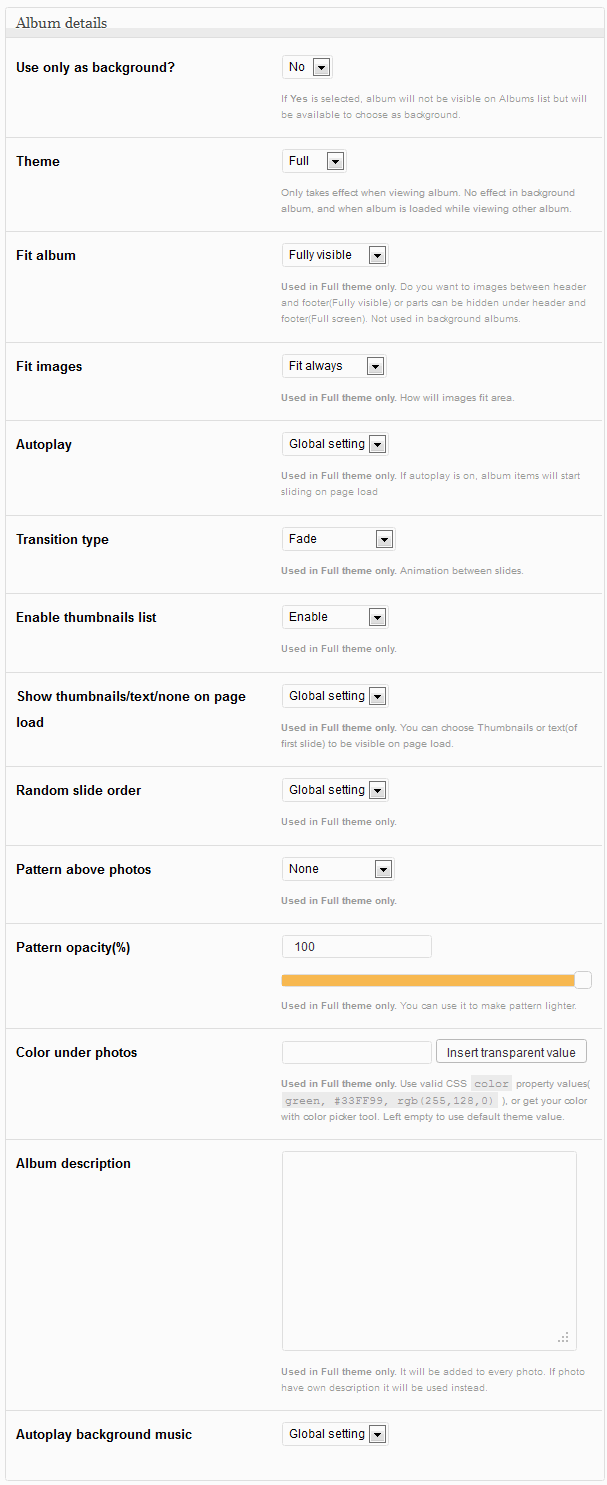
- Use only as background? - if you select this one, album won't be displayed on Albums list, but will be selectable for background album.
- Theme - If you select bricks theme then other options will not have any effect.
- Fit album - Lets you choose if you want to use full screen album, or should it be put between header and footer elements.
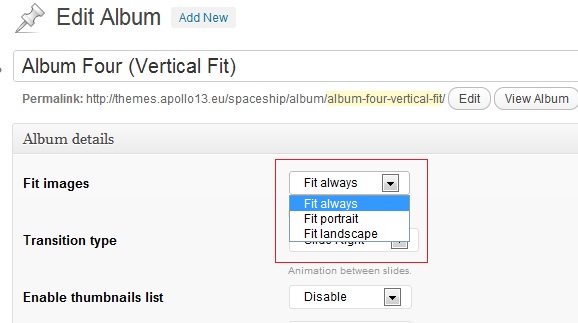
- Fit images - you can use auto(Fit always) or decide in which way images should be streched to fill screen.
- Transition type - 7 types of animation beetwen slides.
- Enable thumbnails list - it shows list of all slides in album.
- Pattern above photos - it will place semi transparent pattern above all photos. You can select from few different patterns. You can also set Pattern opacity.
- Autoplay background music - If you added background music here you can choose to autoplay it. Be careful if you also add auto playing videos to album.
- Album description if you fill this one, each photo be default will get this description. If photo has its won description it will overwrite Album description
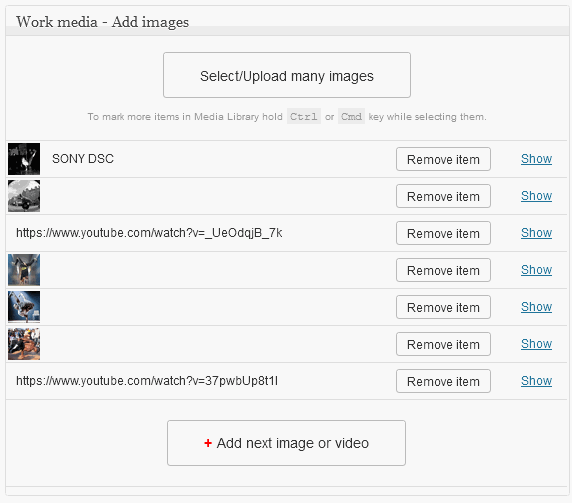
Next it is time to add some photos & videos to our gallery. Lets check screen below.
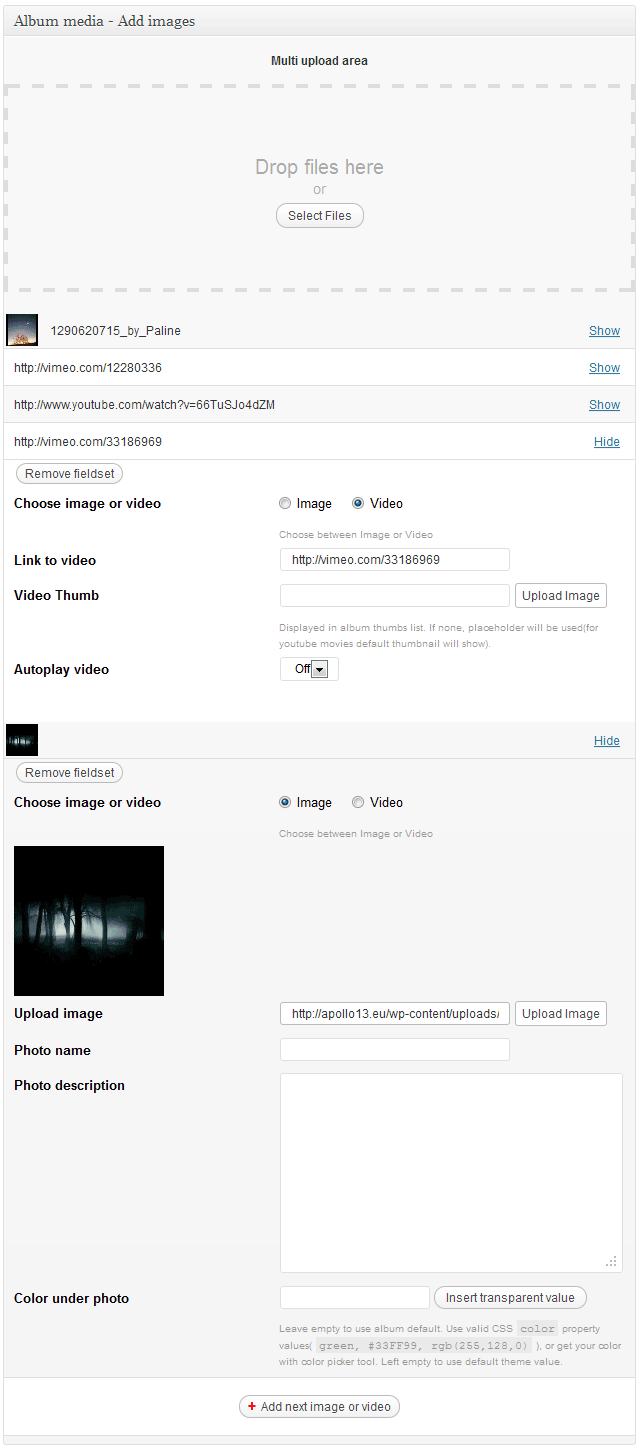
- If your browser supports multi upload then you can use it to upload many images at once.
- You can add title and description for each photo. If you set any of them or choose to display name of album, then they will be displayed above photo.
- Color under photo - you may use set globally for whole album, or overwrite it here.
- If you choose video type, you have to add link to video(youtube link, vimeo link, or link to mp4, ogv, flash file)
- also you may add thumb for video, it will be used in album thumbs list. If you won't provide any then:
- Viemo and Native video will use placeholder
- Youtube will use defult youtube thumbnail
- You can also choose to autoplay video.
As for cover of album, also here images are loaded in full size(same as uploaded).
Adding multiple Albums list
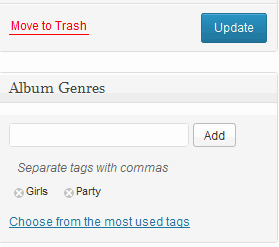
Since Hypershot 1.1 you can create multiple albums list if you wish. To do it, first you have to asign your albums to different categories(genres). You can do it by choosing genres while adding album like you can see on image below.
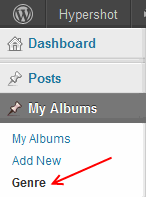
All your genres can be find in My Albums menu under Genre
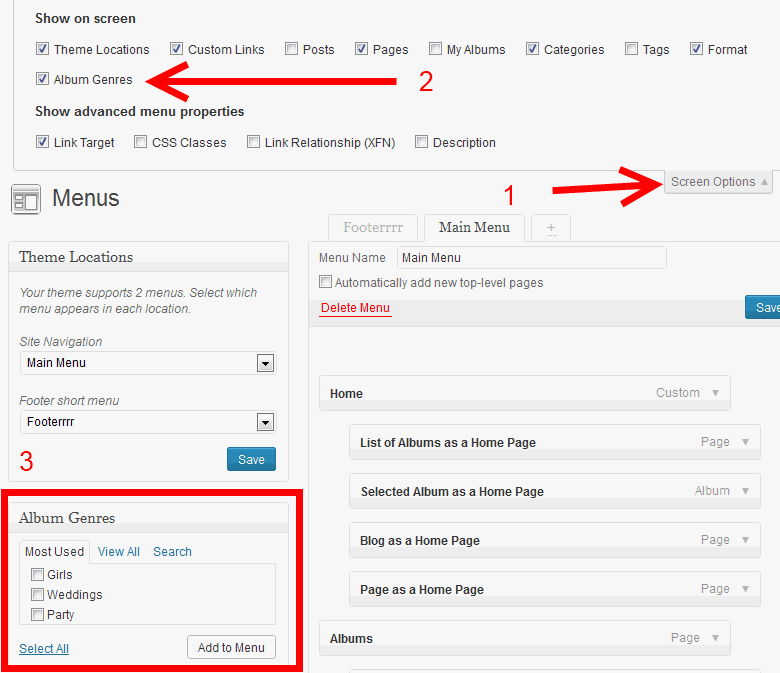
After you asigned different albums to different genres you may want to add this Albums list to menu. To do it go to Appearance->Menus and be sure to activate adding Album Genres to menu, just like you can see on image below
If you are using multiple Albums list then template for Albums list will display all you albums with filter, so you can view them by genre. Filtering only works in Bricks theme of Albums list.
Our theme can display pictures (in albums) in three different ways: 1) Always Fit 2) Fit portrait 3) Fit landscape.
To achieve the best results and enjoy every option to the full, under description of the options we added informations about minimum resolution of the image that will be optimal for all types of screens (from smartphones to Full HD).
1) Fit always – regardless of pictures' height or width, it will always fit them in the height of the browser window so as the entire image is visible.
Live example: http://themes.apollo13.eu/hypershot/album/full-width/
2) Fit portrait – automatically adjusts the display mode to the image size. If an image is higher than wider (portrait), it matches an image up to the window (like “Fit always” option). If an image is wider than higher (landscape), it extends it to the width of the browser window (like “Fit landscape” option).
3) Fit landscape – regardless of pictures' height or width, images always fit in the width of the browser window. While the image is stretched to the entire width of the window, you need to take into account that it will be a little cropped (top and bottom) depending on resolution (screen) we are using while watching the images.
Note! The best and optimal results can be obtained by adding wide pictures ( landscape )
Live example: http://themes.apollo13.eu/hypershot/album/full-width/
Optimal image resolution:
- Portrait – 750px (width) x 750px (height)
- Landscape – 1100 (width) x 750px (height)
Important! The optimal image resolution is given to achieve the best results, while maintaining the smallest file size and speed of page loading. There are no restrictions on adding photos in higher resolution. Nevertheless, the addition of a large photograph can affect the loading speed of the photos in an album and the whole page.
Remember also to compress images to get the smallest file size in order to maintain optimal quality. We managed to get the file size of approx. 80KB for portraits and 130KB for landscapes. It's worth a try!
Background colors for your photos in albums
To get even better results, you can set a different background color for each picture.
To add contact page simply create new page and from templates choose Contact. In this template, contact form will be displayed under page text(content typed in editor). Contact page has also its own widget area.

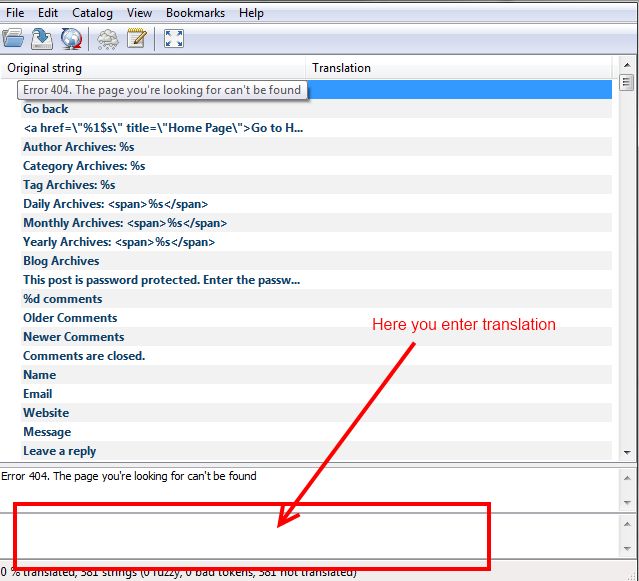
Theme comes translated in to few languages and it is prepared for translation, so it will just require some time for you to see our theme in your language(if it isn't translated to it yet). Important files you will find in theme directory in hypershot/languages/default.po
This file should be opened in program like Poedit and translated. After everything is done you have to save your translation with proper name. Names for each country can be found here (in parenthesis in titles). So for example for German - Deutsch you should save files as de_DE and get 2 files: de_DE.po and de_DE.mo.
Copy these files to hypershot/languages
At end you have to go to your Admin Panel, Settings-> General-> Site Language and set your language.

After that if everything went fine, you will see theme in your language:-)
In every update, file default.po may change as we may add some new functions or fix some spelling, but you can use your old translation to get most of work done.
Good article about translating theme can be found in http://www.solostream.com/blog/tutorials/translate-wordpress-theme/
Also good to read is http://codex.wordpress.org/Translating_WordPress
Here we post image where to type translated texts in Poedit, as not everyone get it right away.
Many of you may be tempted to edit theme files, but by doing so you block yourself from geting updates of theme, as you will loose your changes when you update theme. Fortunately there is solution - making child theme. Even wordpress team advice this as best solution:-)

Anyone intrested in this should read http://codex.wordpress.org/Child_Themes
But lets check how to do it with hypershot theme.
In hypershot there is attached sampel child theme, so you can start changing theme even faster. To install it follow this steps:
-
Install normal hypershot theme.
-
Repeat step 1 but now install theme from hypershot-child-theme.zip
-
Activate child theme.
-
Done.
Now you can overwrite styles, theme functions and even whole templates. Lets check some examples.
Changing CSS
If you want to change background color of content area(default white) under blog post or page you just have to edit style.css in child theme and add:
article{
    background-color: #000;
}
Now you have black background under text :-)
Good tool to detect what should you change and where is Firebug for firefox. Here is tutorial how to use it http://www.youtube.com/watch?v=oe1nqI4fNRc. Any browser has similar tool(under F12 key you can call it).
Custom CSS plugin
For changes in css you can also use plugin. To do it first install this plugin https://wordpress.org/plugins/theme-junkie-custom-css/ activate it, and next go to Appearance->Custom CSS. There you can insert your custom css.
In hypershot default stylesheet is loaded from main theme, and then you can overwrite CSS rules in style.css in child theme. After this come user.css with changes set in admin panel. So finally it loads in this order:
1. main theme style.css or compressed.css(there is no compressed.css since version 1.4)
2. color scheme css file(ex. black.css)
3. child theme style.css
4. user.css(settings form admin panel)
5. Custom css from plugin
Changing theme functions
Another example, you may wish to change info that is displayed under title of each post(date, author, categories, tags) so you have to define your own version of a13_post_info() function. Lets say you wish to remove tags from that list. Just open functions.php in child theme and drop this code:
function a13_post_info() {
    ?>
<div class="post-info">
    <span class="categories"><?php _fe('Category' ); ?>: <?php a13_posted_in( ', ' ); ?></span>
    <?php echo ' <span class="comments"><a href="' . get_comments_link() . '" title="' . sprintf(__fe( '%d Comment(s)' ), get_comments_number()) . '">' . sprintf(__fe( '%d Comment(s)' ), get_comments_number()) . '</a></span>'; ?>
    <?php edit_post_link( __fe( 'Edit' ) ); ?>
</div>
<?php
}
You have now overwritten main theme function, and your version will be loaded.
Most interesting functions you will find in advance/utilities.php(in main theme) , but there is more functions that you can change in child theme. All functions that can be overwritten has before its definition code: if(!function_exists('function_name')). If you wish to change other functions ask on our forum for support in that case or just don't bother with child theme and change main theme ;-).
In case of any questions or doubts, do not hesitate to contact us via our Support Forum http://support.apollo13.eu/
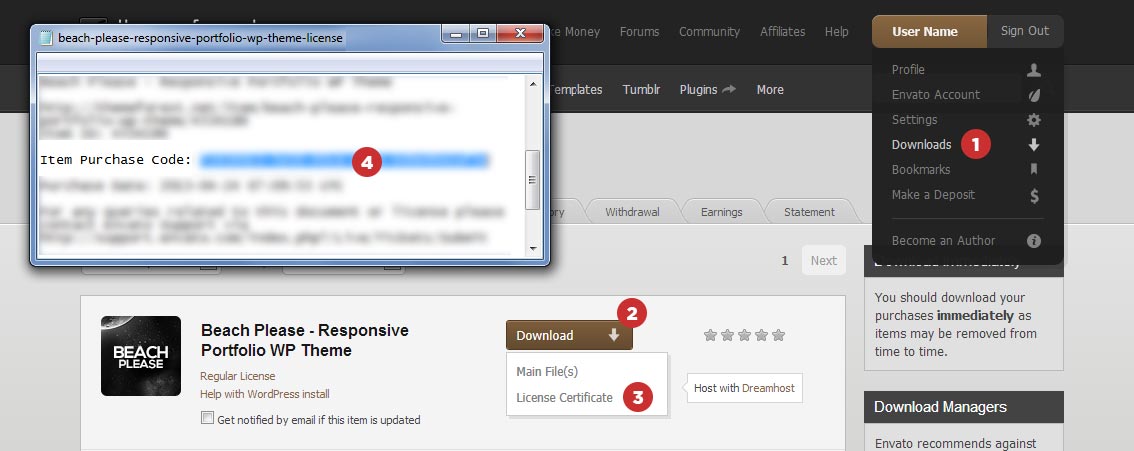
Instruction how to get Purchase Code:
Template image sizes
600 x auto - page, post featured image
127 x 127 - thumbs in sidebar of albums
50 x 50 - thumbs in sidebar of posts
150 x 100(can be chaged) - thumbs of album
320 x auto(can be chaged) - Albums list bricks version
320 x auto(can be chaged) - Single album bricks version
Video/Audio support
Theme support Youtube and Vimeo videos, and also HTML 5 types.
You can insert them by shortcodes or as main post video.
For youtube best to use links as : http://www.youtube.com/watch?v=JByDbPn6A1o
For vimeo best to use links as: http://vimeo.com/12280336
Any other link will be treated as HTML 5 video. Browsers that understand the HTML5 tag will display MPEG/H.264 (.mp4) files, VP8/webm (.webm), or Ogg/Theora (.ogv) files. Other browsers can use Flash to play the .mp4 or .flv.
In pages and posts you can also post audio file. Detection is based on file extension. File will be treated as audio when has one of these extensions: .mp3, .ogg, .m4a
Changing favcion
To change favicon you have to upload your icon to wp-content/themes/hypershot/images as icon.png.
If you want to use other name for favicon change this line in header.php in theme.
<link rel="shortcut icon" href="<?php echo get_stylesheet_directory_uri(); ?>/images/icon.png" />
WP Paginate
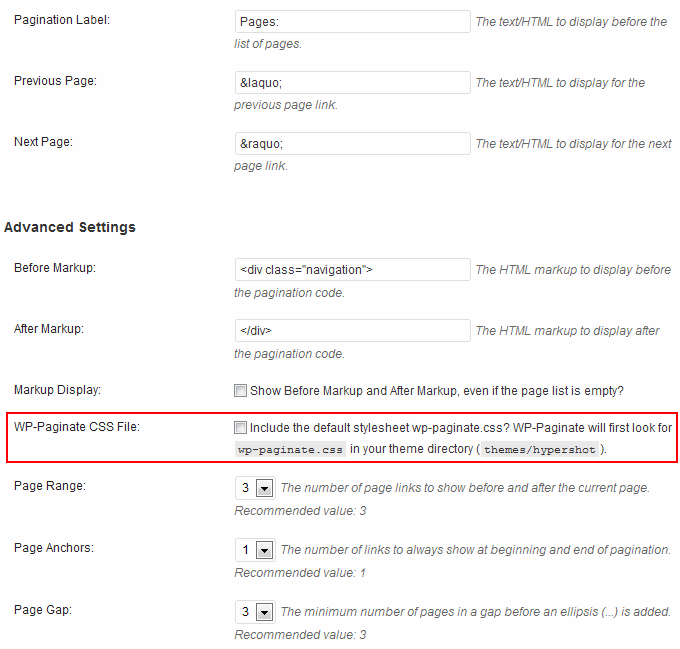
You can get it from http://wordpress.org/extend/plugins/wp-paginate/installation/.
For blog and archives you can either use theme native pagination or enable this plugin and gain some more controll at it. You just need to install plugin and activate it. Also it would be good if you disable defult plugin stylesheet like shown on image below.
AddThis
You can get it from http://wordpress.org/extend/plugins/addthis/.
AddThis is social plugin that will provide support for social media in your blog and albums. Install plugin, configure its options, and you are ready. We done already things that if should look nice with our theme.
Rebuliding Thumbnails
If after changing some theme settings(conected to image sizes) images look weird, then you may have to regenarate thumbanails.
To do that you will have to use some plugin, we advice AJAX Thumbnail Rebuild. Just "Upload the plugin to your blog, activate it, done. You can then rebuild all thumbnails in the tools section (Tools -> Rebuild Thumbnails)." (copied from plugin page).
Flickr
To use Filckr widget styled as in our theme you will have to install plugin Quick Flickr Widget.
Captcha
Do you have problems with spam from our contact form or comments form? Install and activate this captcha plugin http://wordpress.org/extend/plugins/captcha/
Styles for it are prepared in theme:-)
Here is sample configuration:

Custom CSS
Easy way to add custom CSS is to first install this plugin https://wordpress.org/plugins/theme-junkie-custom-css/ activate it, and next go to Appearance->Custom CSS. There you can insert your custom css.
High DPI Screen users(Retina)
I bet 80% of you users use retina(or alike) display;-) That may be true in few years from now. To support such users you can use this great plugin http://wordpress.org/extend/plugins/wp-retina-2x/faq/ . It will serve better quality images for high DPI screens.
The scripts and plugins used is the project:
- jQuery (http://jquery.com)
- VideoJS (http://videojs.com/)
- jPlayer by Mark J Panaghiston (http://www.jplayer.org)
- hoverIntent (http://cherne.net/brian/resources/jquery.hoverIntent.html)
- ScrollTo (http://flesler.blogspot.com)
- Supersized (http://www.buildinternet.com/project/supersized)
- jQuery autoResize (http://james.padolsey.com)
- Placeholder plugin for jQuery Daniel Stocks (http://webcloud.se)
- jQuery mouseWheel Brandon Aaron (http://brandonaaron.net)
- NyroModal v2 (http://nyromodal.nyrodev.com/)
- FlexSlider by Tyler Smith (http://www.woothemes.com/flexslider/)
- Automatic Updates For Private And Commercial Themes (http://w-shadow.com/blog/2011/06/02/automatic-updates-for-commercial-themes/)
- Simple Google Map(http://clarknikdelpowell.com/wordpress/simple-google-map/)
- HTML5 ? Boilerplate (http://html5boilerplate.com/)
and lots of internet wisdom out there. Thanks a lot everybody!
Once again, thank you so much for purchasing this theme. As we said at the beginning, we'd be glad to help you if you have any questions relating to this theme. No guarantees, but we'll do our best to assist.
Apollo13 Team
Social menu
Here you provide links to social profiles you have. Nothing new :-) Only thing that should be explained it is setting number of visible icons. If you set it for example to 3 and you provided 5 links to social networks, than first 3 will be displayed instantly, and other two will be available while hovering this section :-) Simple.
You can drag & drop social items to set them in order you wish to see on your page.
Only filled inputs will activate each social icon. Not filled = not shown :-)