FatMoon | Multi-Purpose Creative & Photography Theme
Documentation
- by: Apollo13
- email: info@apollo13.eu
Thank you for purchasing our theme. In case of any questions or doubts, do not hesitate to contact us via our Support Forum: http://support.apollo13.eu/. We will do our best to solve any problem concerning the project.
At the same time we invite you to visit often our profile on ThemeForest since there will be appearing the improvements of our project and the newest theme updates.
Getting started(HOW TO DO IT?)
You have probably seen our demo page and this is why you bought this theme. To see most of this things in your page you will have to provide proper content for it, and here we will guide you how to achieve this.
I am totally new in to this. Do you have any video tutorials?
If you are fresh with WordPress then please visit http://www.creativebloq.com/web-design/wordpress-tutorials-designers-1012990. We hope it will help you.
After this get more info about theme installation here.
Error while installing/updating theme.
If you see message like "The package could not be installed. The theme is missing the style.css stylesheet.", then be sure that you are extracting ZIP file with theme from whole ZIP file you get from ThemeForest before trying to install.
More info here.
My front page is empty or gives error message.
If you see empty front page after theme installation or message "Apologies, but no results were found for the requested archive. " it means you have to add some content or change front page to display something else.
You will have to add some posts/page or add some albums and albums list page. Next follow this section.
How to make/edit main navigation menu to look like in your demo?
Check this section.
Plugin X doesn't work as it should
Check our plugins recommendations and how they should be configured in this section.
I would like to modify theme, how can I do it?
If you like to edit some CSS and JS, or maybe some theme behaviour you should check theme modification section.
For Updaters(need to know!)
Here will be important info for users that are updating theme and may encounter some problems or 'need to do' things:-)
Hopefully there will be no important info here, so no extra actions will be required.
Known bugs
Validator issues with plugins
When you will activate plugin Facebook Open Graph, Google+ and Twitter Card Tags that helps how content is sheared, it will introduce some code that validator don't like. However you don't have to worry cause it deson't break your site in anyway. It means only that Facebook code is not "standard" fo HTML Validator.
Various shortcodeds of Visual composer also can introduce Validation problems, but we believe that with each new version of this plugin there should be less of them.
Visual composer and Internet Explorer 9
Our theme is compatible with Internet Explorer 9, so all its features will work in that browser.
Visual composer plugin on the other hand is compatible with Internet Explorer 11 and above. It means that some features of it will not work there.
Biggest reason for that is limit that IE 9 has for styles rules in style sheet, and cause VC packs all its styles rules to one big file, they exceed these limits. Effect is such that some shortcodes(elements) of VC are not styles in IE 9.
You can read more about IE 9 limits in this article https://about.zoosk.com/en/engineering-blog/how-ie-9-and-below-calculate-the-4095-css-limit/
Installation & Update
Install
Before you install or update theme it would be good that get familiar with Wordpress info about it. To install theme you can:
-
Upload it via FTP(safer, as it works always)
- Download ZIP file from ThemeForest and find in it fatmoon.zip(theme file). It can also be named with version number like fatmoon_1.2.3.zip
- Unpack files from fatmoon.zip. You should now have directory fatmoon and in it other directories and files like images/, js/, 404.php, header.php, index.php etc.
- upload whole fatmoon folder to /wp-content/themes/ in your WordPress installation
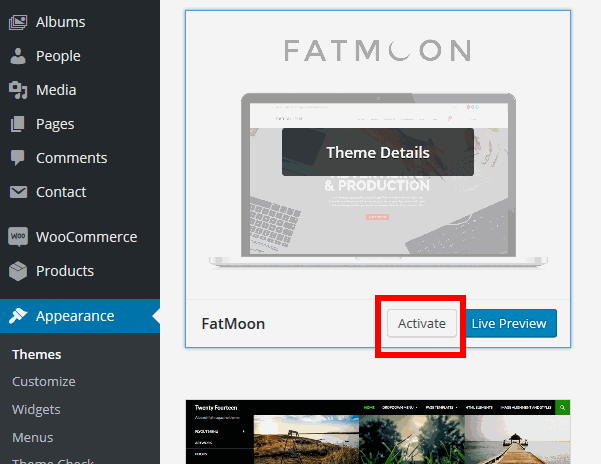
- login to admin panel in WordPress, and go to Appearance->Themes and click Activate below FatMoon theme
-
Upload it via admin panel(can get error while upload on slower connections, or cause of other server/WordPress related issues)
- Download ZIP file from ThemeForest and find in it fatmoon.zip(theme file). It can also be named with version number like fatmoon_1.2.3.zip
- go to Appearance->Themes->Install Themes(Tab)->Upload and choose file fatmoon.zip
- go to Appearance->Themes and click "Activate" below FatMoon theme
Install bundled plugin
Before you proceed any further you will have to install required plugins by clicking link in top notification, check images below:

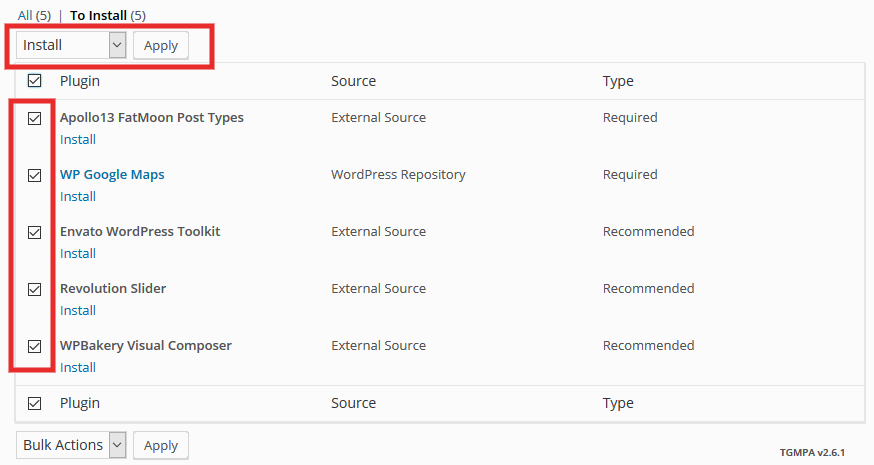
If you don't want to install all recommended plugins you can dismiss notice.
After that you will see new menus like for example Appearance->FatMoon Import, Albums and Works,
BUT all fun begins in Appearance->Customize.
We will talk about all that later.
Plugins fails on installation
If some of embeded plugins fails on install(it sometimescan happen depending on your server configuration),
then you can go to fatmoon/advanced/plugins and install every plugin(zip file) from there manually,
by wordpress panel http://codex.wordpress.org/Managing_Plugins#Installing_Plugins
or by FTP https://codex.wordpress.org/Managing_Plugins#Manual_Plugin_Installation.
Update theme
Updating using Envato WordPress Toolkit plugin:
To update theme you can either follow below description or try to use plugin from Envato named Envato WordPress Toolkit.
Here is description how to use it.
This plugin is bundled with our theme, so you should be able to install it during theme installation.
It is good plugin if you often use themes from ThemeForest and it makes updating commercials themes as easy as those from Wordpress repository.
Updating standard way:
When you got zip file with theme, best way to update theme is to use plugin such as http://wordpress.org/extend/plugins/easy-theme-and-plugin-upgrades/.
If you have problems with updating theme from Wordpress admin panel, then delete theme (from panel or manually via FTP) and upload new version. It is same process as installing via FTP. You wont loose your theme settings.
If you have made some changes in theme files you will have to manually update to keep your changes.
Remember to always backup your data before update!
Use of Easy Theme and Plugin Upgrades
Upgrading a Theme
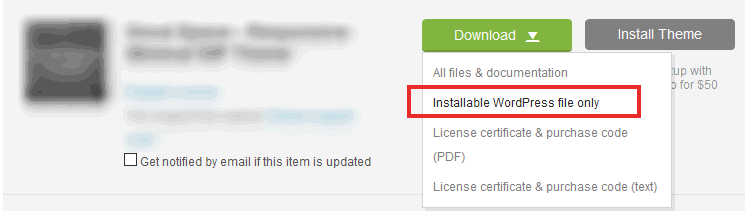
- Download the latest zip file of your theme from ThemeForest.
- Select to download Installable WordPress file only
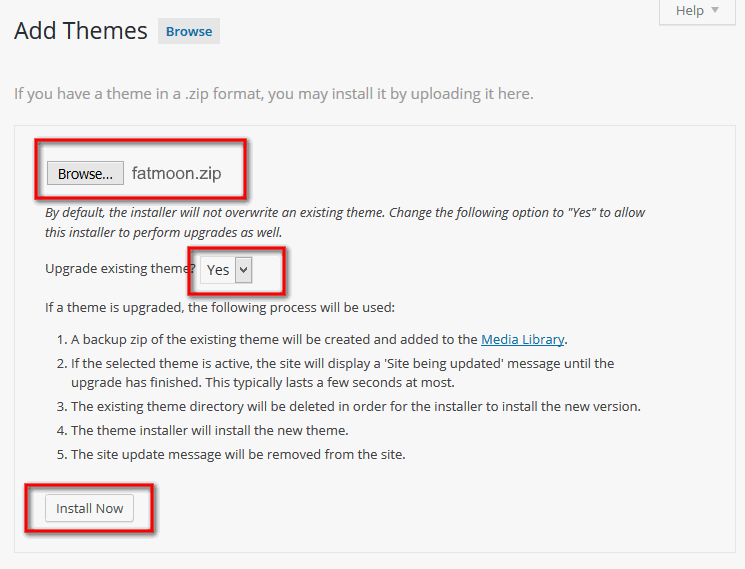
- Log into your WordPress site.
- Go to Appearance > Themes.
- Click the "Add new" button.

- Click the "Upload Theme" button.

- Select the zip file with the new theme version to install.
- Select "Yes" from the "Upgrade existing theme?" option.
- Click "Install Now".
Update bundled plugins
After installing new theme version there is chance there will be needed some plugins updates. You will see similar notice like when installing theme:

If you dismissed previously notice about plugins, you will also wont see it after theme update. To see it again you will have to deactivate and activate again theme. You can also check if there is menu Appearance->Install Plugins. If this menu option is available then go inside and check what need to be updated.
This time you will have to manually update each plugin by clicking update under each outdated(Not updated) plugin. Check below image:
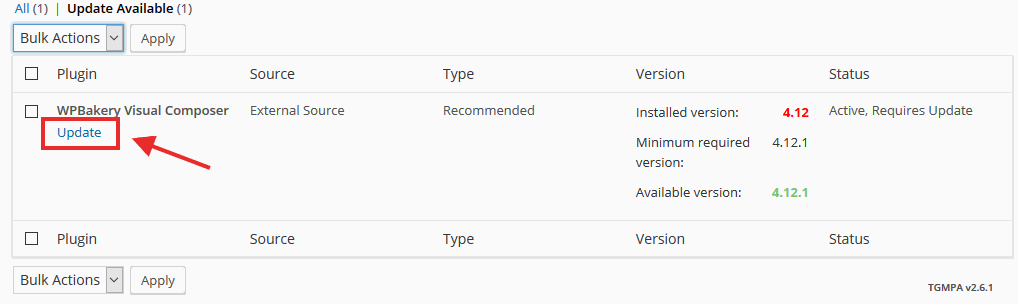
Update bundled plugins issues
If some plugins refuse to update while doing above process, then go to Plugins and disable plugin that is not updating. Then try again to update it as explained above.
If that still won't help for some plugins then in zip file with theme(and in theme folder on your FTP) you will find ZIP files with plugins and you can upload them manually. Files are located in fatmoon/advance/plugins, there you will find files like js_composer.zip. You may need to delete plugin before doing this. Proceed same way like when plugins fail on installation.
After installation
Install demo data
Many users are interested in making their sites exactly as our demo. To do it go and read Installing Demo data. You don't have to follow below steps in this case.
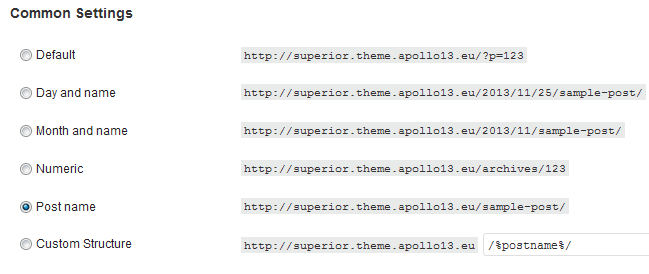
Set permalinks
It is good practice to set permalinks for your site. Go to Settings->Permalinks and set anything other then default settings, most recommended is set it toPost name.
Install plugins
Check our plugin recommendations.
Add menu
Next you should create menu to use it in theme. To do it follow this.
Next you should scan through Theme options to set everything you need.
Installing Demo data
Theme demo data
Along with the FatMoon theme we provide sample data for every single demo site that are listed here.
If you don't want to build your website from scratch then you can easily use one of our demo site as a base for your website - just import demo data of the demo site you like, change content and tune the settings up to your needs.
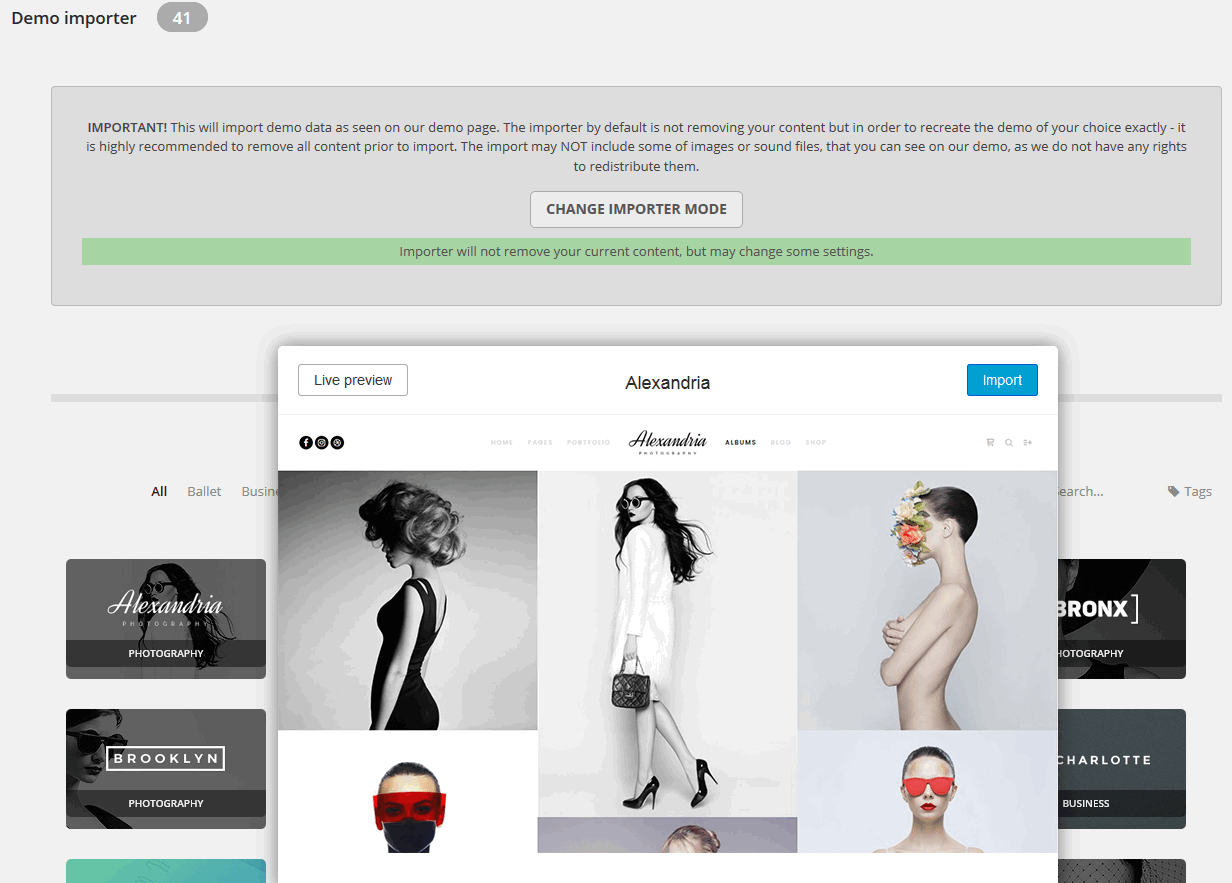
We provide one click import demo! You just go to Appearance->FatMoon Import and you will see demo importer interface, which is rather simple and intuitive ;)
By default the importer is working in safe mode - it means that none of your content will be removed before importing our demo data.
You can change the work mode of import by clicking CHANGE IMPORTER MODE button. Green info bar indicates safe mode, red info bar indicates clean mode.
Clean mode means that all content will be removed prior to import.
We strongly recommend to use clean mode in order to reproduce our demo site on your website without any flaws.
- First you need to provide the purchase code from ThemeForest - here's little how-to. Without it we are blocking this feature.
- Choose the demo you are interested and hover on it
- You can now click 'Live Preview' to look once again at this demo site
- Or you can click 'Import' to start importing process right after being warned of removing all content from your website prior to import demo data.
The process will then start and in few minutes you will have same version of theme as on our demo:-)
However you wont have many of pictures, music files, or other copyrighted content that is used in our demo, as we can't redistribute it. Thanks to this, demo will also import faster.
You need to know that importing demo data will also wipe any pages, posts and other theme settings that are in your site. So it is best to use on fresh Wordpress installation.
What exactly this button do?
- Removing content
- Installing plugins
- Importing content
- Setting up Front Page
- Setting menus to proper locations
- Setting up widgets
- Setting up permalinks
- Setting up various plugins settings
- Importing theme settings
Issues while importing demo
If you face any issues while importing demo data, then 95% of such cases are caused by your server configuration. So before anything else it is good to check server settings. See below image about what you should pay attention to:
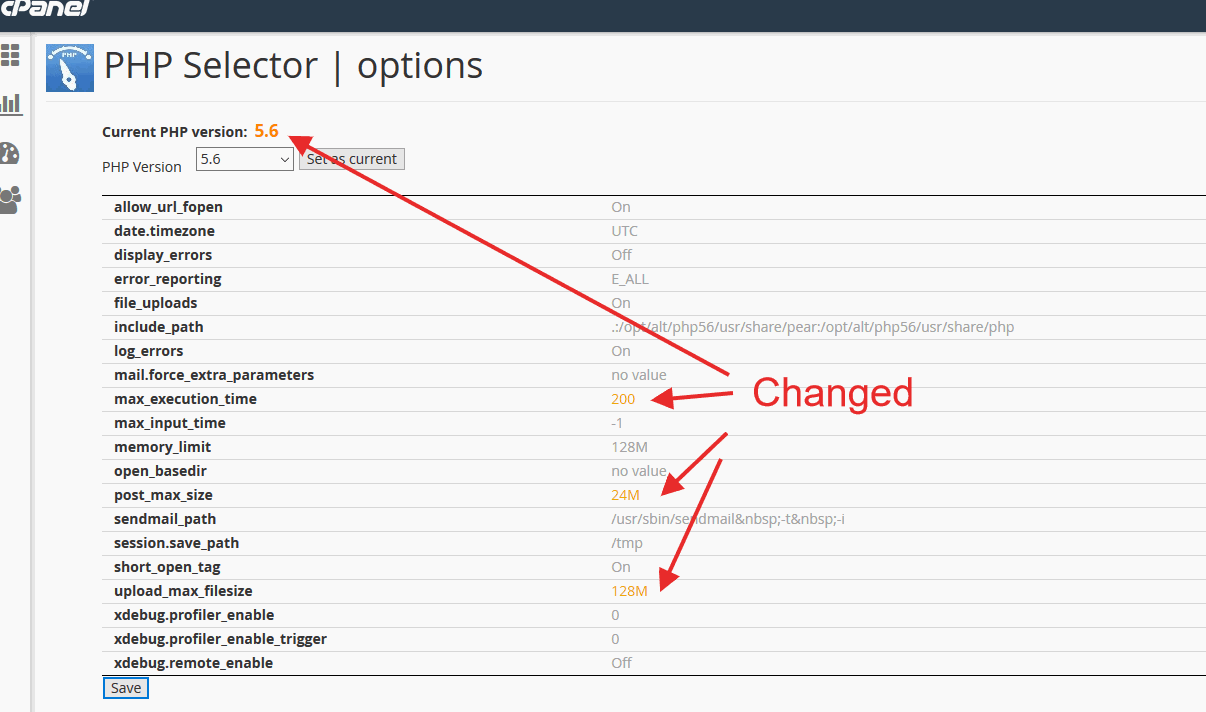
Things to look at:
- PHP Version 5.6 at least - it is much better optimised then any older version. If you have possibility you can also switch to PHP 7(even faster)
- max_execution_time - one of most common source of issues. Give it max possible value(for importing time)
- post_max_size - worth to increase it as well
- upload_max_size - increase it just in case
Also make sure your WordPress have enough memory: https://codex.wordpress.org/Editing_wp-config.php#Increasing_memory_allocated_to_PHP
So if anything wrong happens during import, please check your PHP settings, or send link to this section to your server administrator.
Adding menu
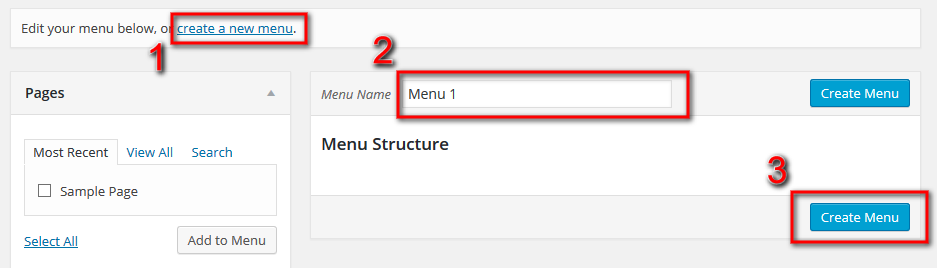
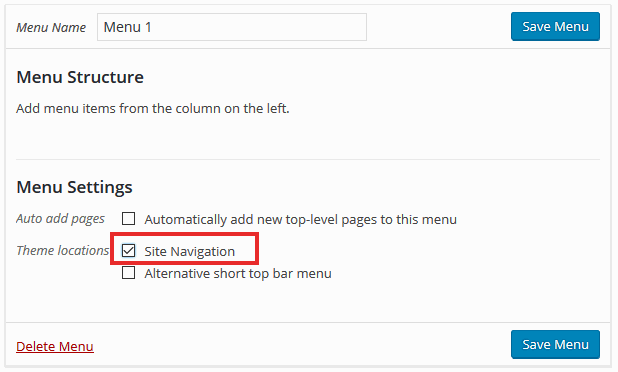
To create main menu go to Appearance->Menus, create some menu(even with one position) and select this menu as Theme locations-> Site Navigation. Read more about creating WordPress menu.
Enabling custom post types in menu
Menu enhancements
For every position in menu you have few bonus options that will be used only in Site Navigation menu:
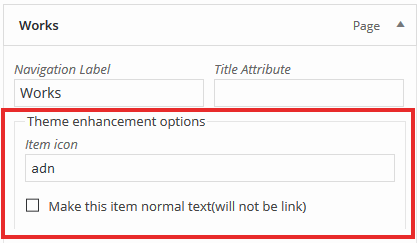
So you can add custom icon and also check option to Make this item normal text(will not be link) - useful for parent of submenu.
Using mega menu
We will talk here about such effect:
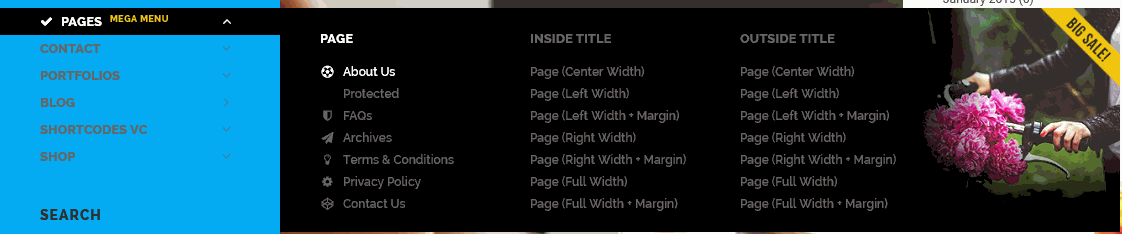
This kind of menu is intended for situations when you wish to show many sublinks in columns. It offers naming columns with linkable title.
This is how you should arrange your menu items to make it work
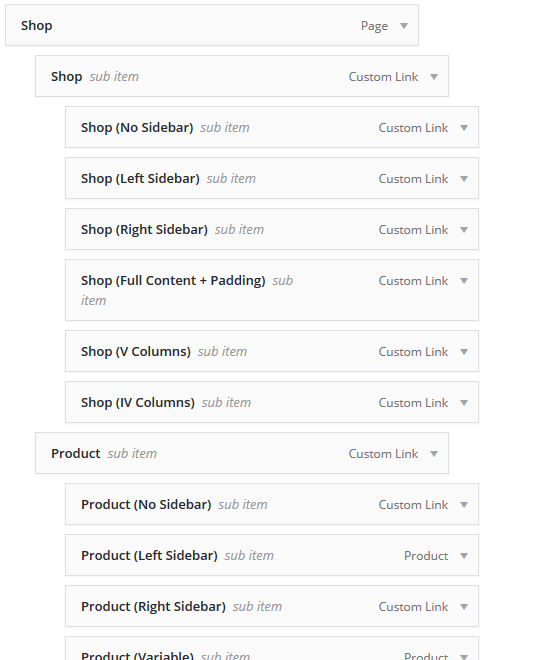
First two levels of menu have different options available.
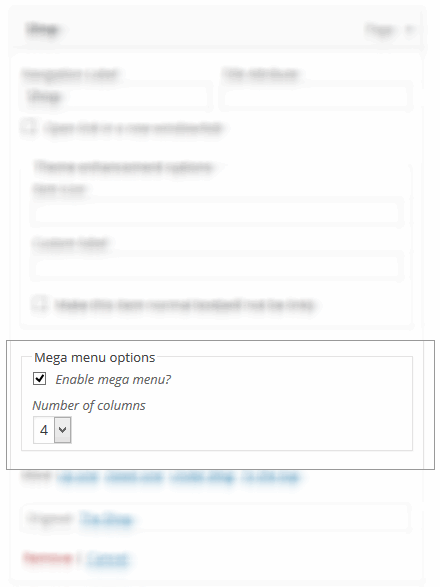
- Level 1:
- Enable mega menu? - Only if checked other options will appear.
- Number of columns - Three variants.
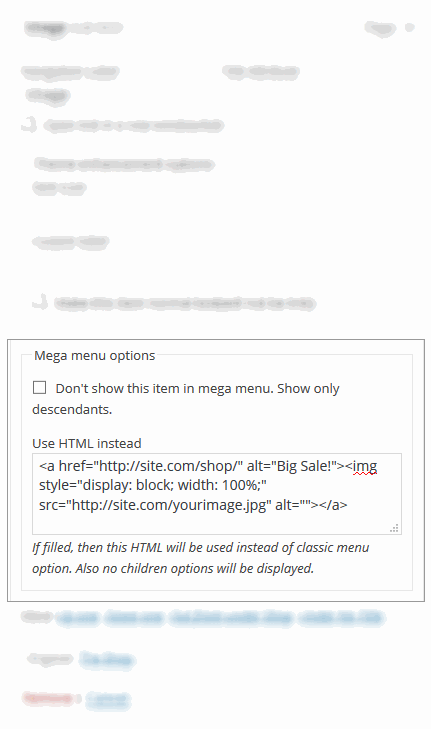
- Level 2
- Don't show this item in mega menu. Show only descendants. - if checked this item won't appear.
- Use HTML instead - good for showing some linked image, or other special things. Sample HTML code for this can look like this:
<a href="http://site.com/shop/" alt="Big Sale!"><img style="display: block; width: 100%;" src="http://site.com/yourimage.jpg" alt=""></a>
Changing options
All theme options you can find in Appearance->Customize. Changing options through Wordpress Customizer gives you live preview of changes before you save anything, so no more guessing what each change will bring to your layout(there are some tiny exceptions).
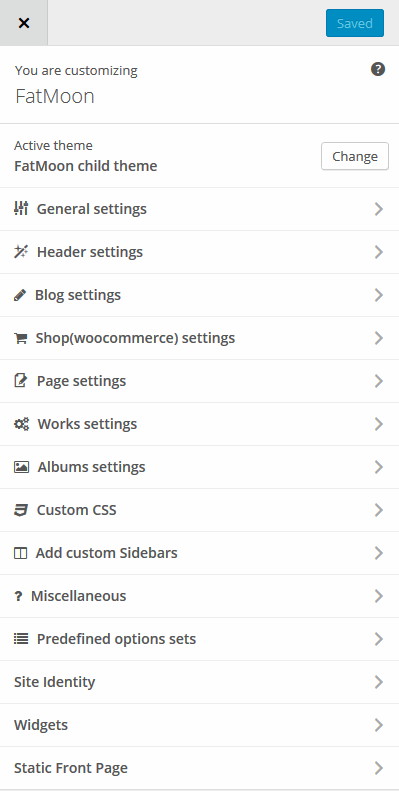
General settings
In these settings you can set things that will have effects on whole your site. You set here parts of general layout and some content that is defined by theme.
Some parts can be overwritten in other settings like Blog, Pages, Albums, Works and Shop.
Front page
Here you set what you wish to see on Front page. You can choose from:
- page - static page added in Pages menu
- Blog - it is default WordPress front page
- Single album
- Albums list - list of all albums(you can also add it as separate page)
- Single work
- Works list - list of all works(you can also add it as separate page)
For proper work of theme you should define Front page and Blog page. To do it, follow Adding Frontpage section.
If as Front page you choose Single album then in Select album to use as front page you can select which one should it be.
If as Front page you choose Single work then in Select work to use as front page you can select which one should it be.
General layout
You can set here general background of site, layout type and even custom mouse cursor(christmas cursor?).
It is worth noting that Bordered layout type, will be displayed for devices with screen wider then 1300px. For smaller screens border will not be displayed.
Page preloader
Here you can set few things about preloader: background, colors, animation, text. Page preloader works as mask for time while layout of page is not ready yet and it(page) is not useful.
Cookie message
You can use cookie message for various messages that should inform viewer about something while entering site. When message is closed, then this message will not appear for user for 7 days.
This is very simple mechanism, for simple usage. However if you need more functionality we advise to search for plugins that do same thing.
Footer
These settings give you control about how footer of your site will look. You can also add here some footer text content.
Some colors and options will be ignored when vertical header is activated, cause then footer is integrated in header. Also in vertical header, social icons of footer will be used, as vertical header has no social icons on its own.
Hidden sidebar
It is always available sidebar(It is only active if it has some active widgets in it). User can view it by clicking on icon in header. Good for some special menus or other tips, information for user. You can set here few things about its appearance.
Fonts settings
Here you can choose fonts for your page. You can set font for 3 main layout elements:
- Font for top nav menu, interactive elements, short labels, etc.
- Font for Titles/Headings
- Font for normal(content) text - text in posts/pages, and other places with lot of text.
If you choose Standard font then remember that this setting depends on fonts installed on client device. However it is fastest loading option.
If you choose Google Webfont then remember to choose needed variants and subsets. For preview, google font is loaded with variants regular and 700, and all available subsets. You have to select what subset of chars do you need for your language, and also what styles you wish to use.
For example, fonts for titles should always be selected with bold style(600 or 700), unless it is set different, cause in other case, browser will try to emulate bold face of font, and it might look strange. Same with font for content, you should choose font that have bold, italic and maybe italic bold style.
On other hand if some variant will not be used in your page you shouldn't select it, cause it will only make loading of your page slower. Same goes for subsets.
If you will write mainly in english then you should be good with almost any font. If your language has some different chars you should always test your selected font.
It is good practice to not use too many different fonts, and also to select some classic font for content.
Headings styles
Here you set styles of Headings in theme.
Content styles
Here you will have some settings that apply to main content of pages, posts, generally places with blocks of text.
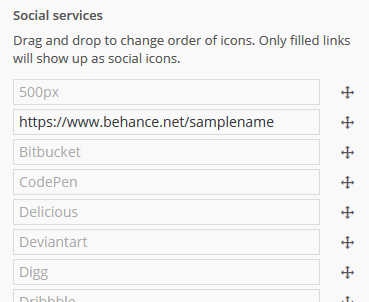
Social settings
Here you provide links to social profiles you have. What you set here will be displayed in Apollo13 Social Icons widget, and other layout places(header, footer) that allow displaying socials icons.
You can drag & drop social items to set them in order you wish to see on your page.
Only filled inputs will activate each social icon. Not filled = not shown :-)
Theme lightbox
Here you can set many things about appearance of lightbox - controlls, icons, colors.
If you wish to use some other plugin/script for images and items, you can switch default lightbox off. Keep in mind that it will require custom coding form you to make it work with theme same way as default lightbox.
Widgets
Just one general setting, that can affect how you wish to construct your pages with sidebars. It is used on various our demos to create illusion of same base line where content starts.
Albums Settings
Here you can set things for Albums list, Categories of Albums and single album.
You can overwrite here Global settings for page background and title bar.
Here you can also enable filter for Albums list and set its appearance.
Albums list
Setting in here will affect Albums list and Categories of Albums.
You can set number of columns, Albums look, hover effect and decide should categories(for each album) be displayed on albums list.
If you want you can set Albums list main page so it will enable some links in theme to lead to this page.
Few notable mentions:
- Lazy load - Disabled gives classic pagination, and enabled gives two options for lazy loading next items.
- Custom header sidebar - Here you can overwrite sidebar set in Appearance->Customize->Header settings.
Single album slug
If you set Permalinks then you should follow below rule.
Most important thing is to don't create page with same slug as set in Album slug name,
or you will encounter issues with displaying albums. You have to set some slug, dont't leave it empty.
Best to just leave it as default.
Single album social icons
If you are using AddToAny plugin then you can enable here sharing icons for albums.
Here you will also find option to define way of sharing images of album. It is named Share link to album or to attachment page.
- When using Album option, then while sharing you will see thumbnail of album(instead of clicked photo). When user will click this shared link, it will take him to album and open this photo in lightbox.
- When using Attachment page option, then while sharing you will see clicked photo as thumbnail and all details will be only about this photo. When user will click this shared link, it will take him to attachment page, form where you can find link to original album.
If you would like to disable sharing icons on some album, for example on album on your home page, then you can do it while editing this album. Check below screen shot.
Single album - bricks
You can choose to display text content of your album and choose how should video be displayed in bricks
Navigate by categories gives you option to change default navigation(to next/previous album) to only look for items in same category.
Single album - slider
You set here interval, transitions speed for all album sliders. Autoplay, Transition type and list of thumbs can be set here globally and also in each album.
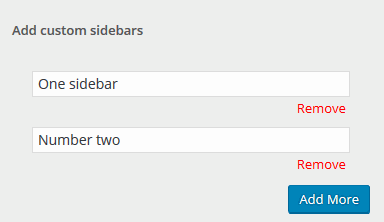
Custom Sidebars settings
Here you can create custom sidebars. Later you can set them to be displayed in pages. If you wish, each page can have own sidebar!
To add sidebar simply add its name and click Save Changes. After you add new sidebar you can manage it in Appearance->Widgets.
Widgets & Sidebars
In Appearance->Widgets menu you will see set of widgets. To use it just drag and drop them to sidebar you would like to see them in. Available sidebars:
- Blog sidebar - Widgets from this sidebar will appear on blog, search results, archive page and 404 error page.
- Post sidebar - Widgets from this sidebar will appear in single posts.
- Page sidebar - Widgets from this sidebar will appear in pages.
- Shop sidebar - Widgets from this sidebar will appear only in shop pages. Woocommerce have to be installed and activated.
- Hidden sidebar - It is always available sidebar, that is activated by clicking on icon in header. Good for some special menus or other tips, information for user.
- Basket sidebar - It is always available sidebar (but only active if woocommerce is installed and activated), that is activated by clicking on icon in header. You should place there cart widget and also some promotions widgets for example.
- Header(vertical) default widget area - Widgets from this area will appear in header lower part. Thanks to this you can decide what you need also in header. For example This is good place if you wish to add search form, contact info, other text for you users. It should come in handy. However as there is no space for these widgets in mobile header, there are hidden there.
- Footer widget area(Header horizontal) - Widgets from this sidebar will appear in footer. In footer settings you can set hwo many columns there should be.
Available widgets:
Besides default Wordpress widgets, we also added:
- Apollo13 Social Icons
- Contact information
- Popular Posts
- Recent Albums
- Recent Works
- Related Posts
- Shortcodes
We have also extended 3 other widgets. In case of these widgets use these prefixed with FatMoon - :
- Custom Menu
- Recent Posts
- Recent Comments
Adding Frontpage
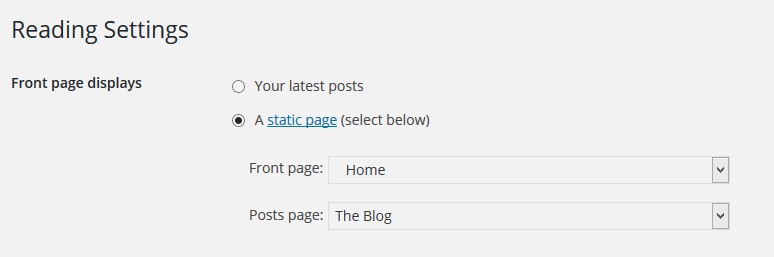
To make frontpage and Blog work as it should you have to follow this steps:
- Go to your WordPress Pages->Add new
- Add new page named Home Page and another named Blog. These names are examples, you can change them.
- Go to Settings->Reading->Front page displays
- Choose "A static page (select below)"
- In Front page: choose Home Page
- In Posts page: choose Blog
- Save changes.
- You are done :-)
To select what should be visible on front page go to Appearance->Customize->General settings->Front page->What to show on front page?
Also if you want to add Blog as separate page just go to Appearance->Menus and add selected Posts page to menu.
With these settings you can setup your front page easily, but there are few things you need to be aware:
- Front page as Page
- Content for this page and all settings are set in Page you selected for Front page(here it will be page named Home).
- Front page as Blog
- Content for this page are posts and all settings are set in Appearance->Customize->Blog settings. Title displayed on blog is title of Posts page or if there is none such page then it use default text from translation.
- Front page as Albums list
- Content for this page are albums and settings are set in Appearance->Customize->Albums settings.
- Front page as Album
- Content for this page and all settings are set in Album you selected to display on Front page(Appearance->Customize->General settings->Front page->Select album to use as front page).
- Front page as Works list
- Content for this page are works and settings are set in Appearance->Customize->Works settings.
- Front page as Work
- Content for this page and all settings are set in Work you selected to display on Front page(Appearance->Customize->General settings->Front page->Select work to use as front page).
Adding New Posts
If you are not familiar with adding posts in WordPress please read http://codex.wordpress.org/Writing_Posts
Adding posts is same as always in WordPress, but with few additional options from our theme.
Posts options
Options are divided into few tabs. Below we will describe few options from them:
- Alternative link - If you fill this then when selecting post from Blog(post list), it will lead to this link instead of opening post.
- Post media - You can choose between Featured image, Images slider(you will need Featured galleries plugin) or Video to represent post.
- For Featured image you can also decide to add parallax to it with Featured image parallax and Parallax area height options
- Size of brick - How many bricks area should take this post in posts list.
- Page background - you can decide to use default background or to change it specially for this post.
- Hide content under header - You can either choose to push content layer below header, so you can achieve some fancy effects(with transparent, or semi-transparent horizontal header), or use normal flow, when content will start after header.
- Header custom sidebar - overwrite global value for it.
Posts excerpts
If in Appearance->Customize->Blog settings->Posts list->Type of post excerpts is set to Automatic,
then if while writing posts you won't use more tag,
then theme will use excerpt feature. Excerpt are made automatically, but you can also specify what will be displayed.
Just find Excerpt box, and type text you wish - read more.
If you won't give excerpt either, then post will be cut after first 40 words. This number can be changed in Appearance->Customize->Blog settings->Posts list->Number of words to cut post.
Post formats
Our theme supports also Post Formats. In implementing them we are following general guidelines from Wordpress.
Adding New Pages
If you are not familiar with adding pages in WordPress please read http://codex.wordpress.org/Pages
Adding pages is same as always in WordPress, but with few additional options from our theme.
Pages options
Options are divided into few tabs. Below we will describe few options from them:
- Subtitle - If filled it will appear in title bar.
- Post media - You can choose between Image, Images slider(you will need Featured galleries plugin) or Video to represent page.
- For Featured image you can also decide to add parallax to it with Featured image parallax and Parallax area height options
- Sticky One Page mode - you have to enable it to make special type of page that is described in Sticky One Page.
- Content layout - You have several layouts to display your page.
- Hide content under header - You can either choose to push content layer below header, so you can achieve some fancy effects(with transparent, or semi-transparent horizontal header), or use normal flow, when content will start after header.
- Header custom sidebar - overwrite global value for it.
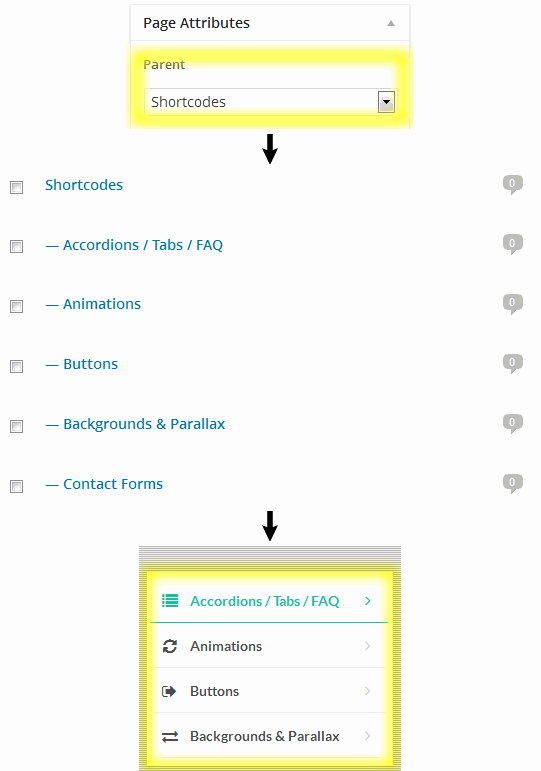
- Sidebar - Global settings, left, right, off(full width content) and options with Children navigation.
If you arrange your pages into sub-pages then you can display this hierarchy with one of these options(check below description). - Sidebar to show - Here you can choose custom sidebar, if you created any.
- Page background - you can decide to use default background or to change it specially for this page.
Children navigation
If you arrange sites in children/parent then you can display this order in sidebar of each page. Below you can see on image how it looks in wild:
Post grid shortcodes
Theme is equipped with Visual Composer plugin that allows you to design pages layouts with use of numerous shortcode. Two of them give to user a tool do display different types of posts. Those shortcodes are:
- Post grid
- Post masonry grid
While working with these shortcodes you can see a tab named Item Design with selectbox to choose a way of presenting single item (for instance single Post or single Work).
If you did not decide to import entire demo it's important for you to know and remember that we added several new Item Designs,
and they are prefixed with word Fatmoon.Thanks to them we achieved current demo pages feel&look cause in most cases they mimic current settings of theme.
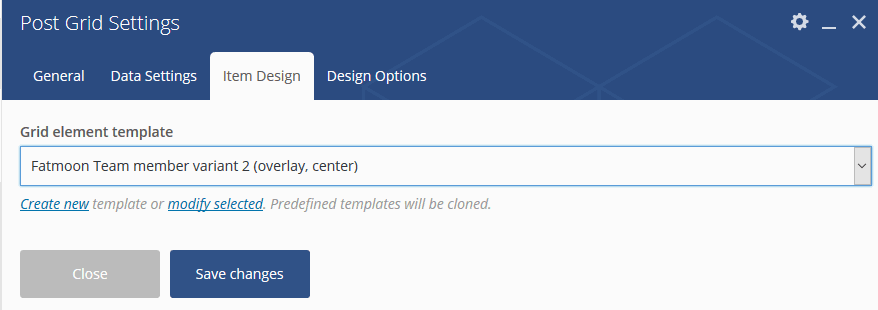
So be aware of this whenever you are about to design new page from the scratch and you want it to look similar to one of our demo page.
The full list of our Item Desings are accessible from Visual Composer->Grid Elements. Please do not edit nor delete them.
One Page
Designing the One Page layout
These are the steps you should take in order to produce a fully functional One Page layout:
Create new page and enable Visual Composer by pressing 'Backend Editor' button.
One Page layout is build with blocks of content that are distinguishable and accessible from navigation menu - so now create an element name 'Row' - it'll be a container for a single content block.
At this point you can create as many rows as many content blocks you're planning to have.
Now fill those rows with content.
-
Now edit the properties of each row. Take a look at the picture below:

- point 1 - 3: edit row, go to 'One Page Navigation' tab and check 'Enable One Page Navigation?' checkbox
- point 4: enter the name of your choice into last input and press 'Enter'. This will create new One Page Navigation Pointer, which will be automatically added to selectbox above.
- point 5: this form control allows you to browse/choose/delete available One Page Navigation Pointers. Each One Page Navigation Pointer has unambiguous annotation if it is currently assigned to content block in another page.
- once you have selected (or added) One Page Navigation Pointer click 'Save changes' button
Once you finished designing page and configuring content blocks - save the page and move on to arrange navigation menu.
Arranging navigation menu
Arranging navigation menu is rather trivial, nevertheless please take a look at the picture below.
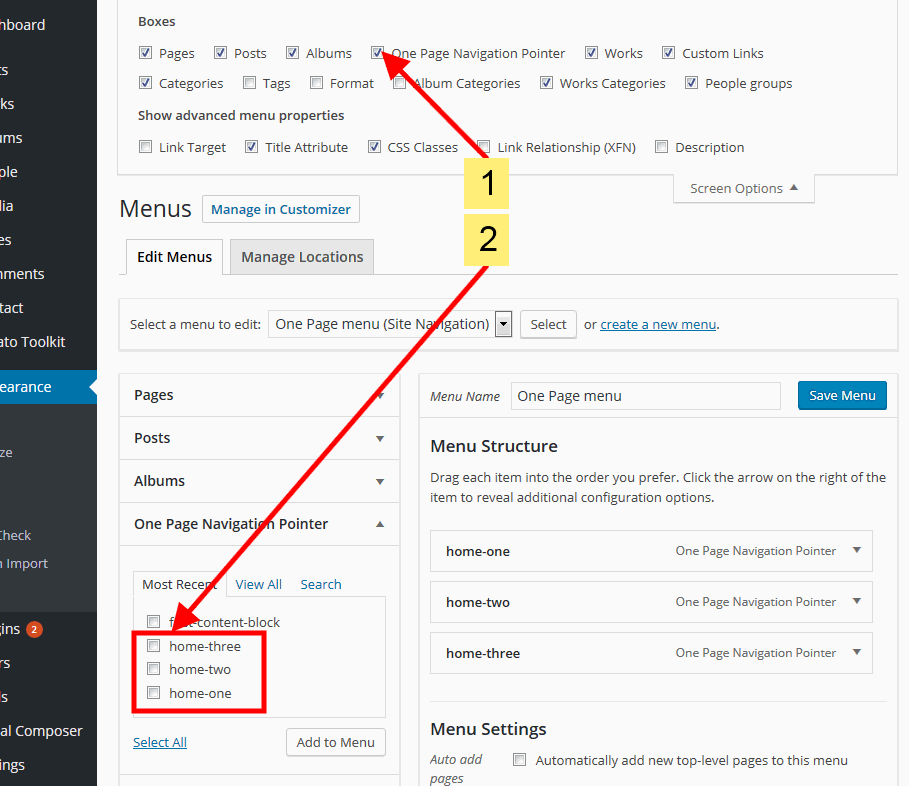
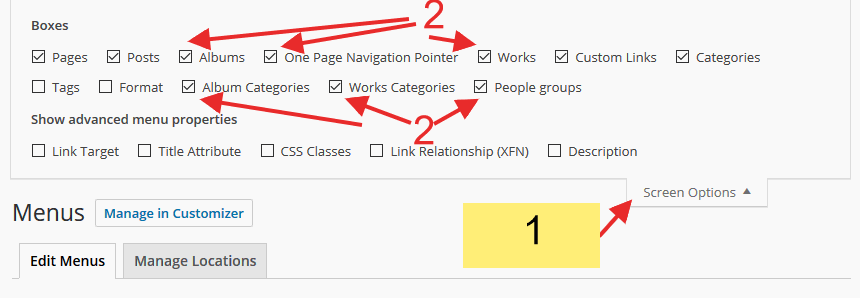
- please make sure that you have 'One Page Navigation Pointer' checked in 'Screen Options' area. Otherwise you'll not see available One Page Navigation Pointers.
- proceed as usually with navigation menus in WordPress - please refer to this article
If your website has several pages, and one of them is designed as OnePage then we find worth mentioning existence of plugin named Menu Swapper - it allows you to create separate navigation menu for separate pages.
Sticky One Page
Sticky One Page mode allows you to display page in presentation-like way. Page behaves more like vertical slider.
In order to enable this mode go to metabox 'Page layout' below Visual Composer editor and set
Sticky One Page mode to enable.
This will make two more options available:
- color of navigation bullets - allows you to set default color of navigation bullets shown on the right side of page.
- default bullets icon - allows you to set a default bullet icon by use of Font Awesome classes.
Moreover you can alter the options listed above for each content row. In order to do so - take steps pointed below
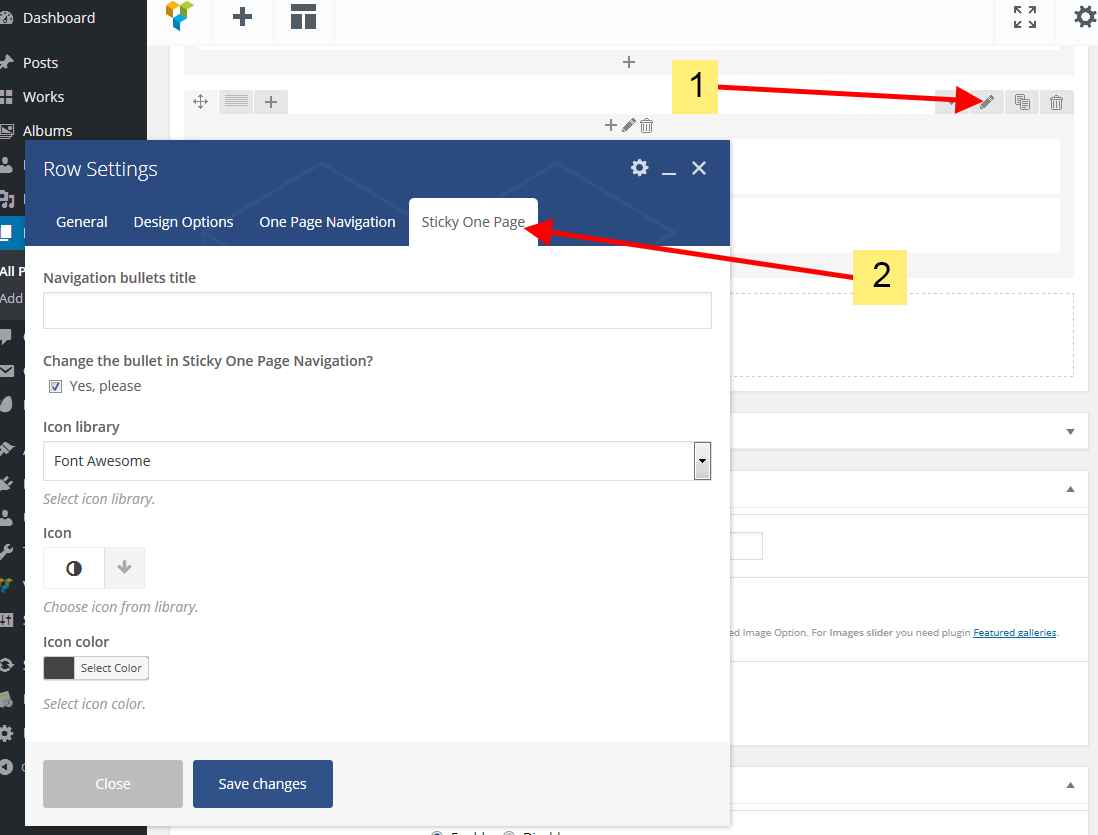 You can add a Title (visible when hovering bullet or when it's active), change the icon and its color.
There are several constrains while using Sticky One Page mode:
- You are forced to design the page with use of Visual Composer
-
Few parameters need to be set exactly
- Row stretch must be set to 'Default'
- Full height row? and Equal height? must be turned off
- Paralax parameter is not working in this mode
Adding Albums & Works
As both works and albums are very similar in whole workflow with them, we will describe them together. However remember they are two different post types, designed for different things.
Before you start anything below, it is good to visit Appearance->Customize->Albums settings and Appearance->Customize->Works settings
Adding Albums list
Adding Works list is same process as described here below, but done in Works.
To add Albums list to your site first you need to create Albums list page:
- Add new page(Pages->Add new)
- Name it as you wish but keep in mind that if you use nice addresses (eg. yourblog.com/about-me )
than slug of your page have to be different then slug for albums set in
Appearance->Customize->Albums settings->Single album slug (for works Appearance->Customize->Albums settings->Single work slug ), so everything will work correct.
Best name this page as "Albums" or "Portfolio".
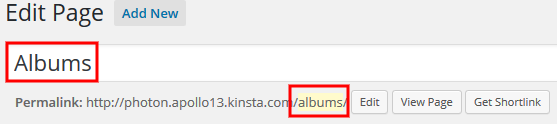
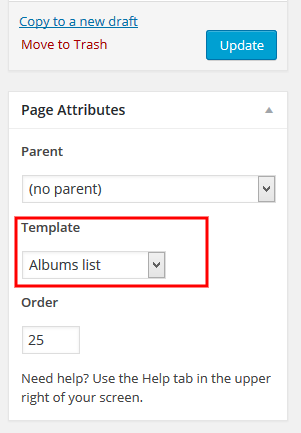
- From template list choose Albums list(image below).
- Publish Page.
- Done
Add new album
Adding new work is same process as described here below, but done in Works.
Adding new album is pretty easy. First you should set title and Featured image as it is cover of your album which is visible on Albums list page.

Next you can fill description about this album by using main editor. This description will be only displayed in bricks album. For works it will be displayed always.
Album options
Just like previously Work options is mostly the same as described here below. Unique options for works or albums will be marked with Only for works or Only for albums.
Options are divided into few tabs. Below we will describe few options from them:
- Alternative link - If you fill this, then clicking on your album on Albums list page will not lead to single album page but to link from this field.
- Subtitle - If filled it will appear in title bar and on Albums list page.
- Size of brick - How many bricks area should take this post in albums list.
- Only for albums. Exclude from Albums list page - If enabled, then this album wont be listed on Albums list page, but you can still select it for front page or in other places.
- Only for works. Exclude from Works list page - If enabled, then this work wont be listed on Works list page, but you can still select it for front page or in other places.
- Only for works. Content layout - You have several layouts to display your work.
- Only for works. Page background - you can decide to use default background or to change it specially for this page.
- Header custom sidebar - overwrite global value for it.
- Hide content under header - You can either choose to push content layer below header, so you can achieve some fancy effects(with transparent, or semi-transparent horizontal header), or use normal flow, when content will start after header.
- Items order - It will display your images/videos from first to last, from last to first, or random order.
- Only for albums. Show title and description of album items - If enabled, then it will affect displaying in bricks and slider option, and also in lightbox.
- Only for works. Show title and description of work items - If enabled, then it will affect displaying in bricks and slider option, and also in lightbox.
- Internet address - You can provide link that is connected to this album.
- Custom info 1-5 - Five custom fields for more details about album. If empty it won't be displayed.
Use pattern Field name: Field value. Colon(:) is most important to get full result. - Present media in - you have 2 options to choose from: Bricks and Slider.
- Bricks:
- Content column - This will display separate block with title and text about album. You can switch sides or turn it off.
- Bricks columns
- Max width of bricks content - available space for bricks might be smaller, but newer greater then this number.
- Brick margin - margin between bricks
- Choose brick proportion - thanks to this you can have images in one size, even if you upload images in different proportions.
- Hover effect - few fancy effects how does bricks look on mouse hover
- Slider:
- Color under title - It will make background under title text on slides. Gives fancy effect.
- Fit images - you can use auto(Fit always) or decide in which way images should be stretched to fill screen.
Fit when needed is best for small images, that shouldn't be stretched to bigger sizes, only to smaller(to keep them visible).
However Cover whole screen is best options in most cases. - Autoplay - If autoplay is on, slider items will start sliding on page load.
- Transition type - 4 types: Carousel, Fade and no transition. Also Zooming known better as Ken Burns Effect.
- Gradient above photos - Good for better readability of slide titles.
- Pattern above photos - Used for masking and some darkening.
- List of Thumbs - Enable/disable and decide should it be visible on page load.
- Bricks:
Album media
Just like previously adding Work media is same process as described here below, but done in Work media - Add images/videos.
Next it is time to add some photos & videos to present our album. We will work in section Album media - Add images/videos Lets check screen below:
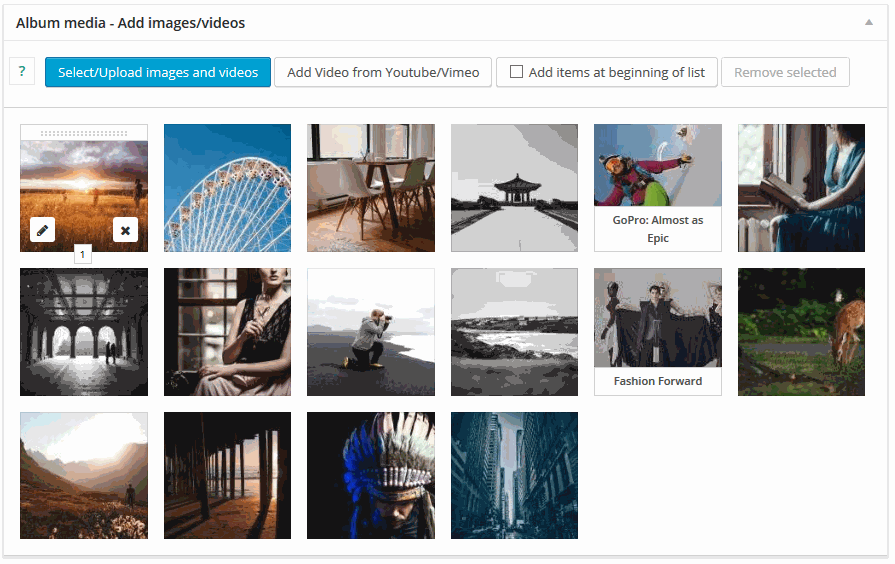
- If your browser supports multi upload then you can use it to upload many images at once. To do it use button Select/Upload images and videos
- To add single video from Youtube or Vimeo use button Add Video from Youtube/Vimeo.
- To mark more items in Media Library and in item list, you can use
Ctrl(Cmd) orShiftkey while selecting them with mouse. - You can drag and drop each item to reorder them.
- To edit item details click on Pencil icon while hovering.
- Every image and video from media library can be used only once in each album.
- Editing details of images and video from media library are done in Media->Library.
- Editing details of video from Youtube or Vimeo are done while editing item - Pencil icon.
- For image item you have following options:
- Works only for albums. Tags - You can add tags here to enable filtering for single album.
- Link - if filled then clicking image will take you to this URL. Also then this photo won't be visible in lightbox.
- Product this image represents - If you fill this, then on image you will see "add to cart" button for selected product.
- Color under photo - Used in slider.
- RatioX in bricks theme - How many bricks area should take this image. Used only in Bricks.
- For video item from Media Library you have following options:
- Works only for albums. Tags - You can add tags here to enable filtering for single album.
- Autoplay video - Works only in slider
- RatioX in bricks theme - How many bricks area should take this video. Used only in Bricks.
- To set thumb for video from Media Library:
- Find this video in Media Library and click it to open popup
- In popup find link Edit more details
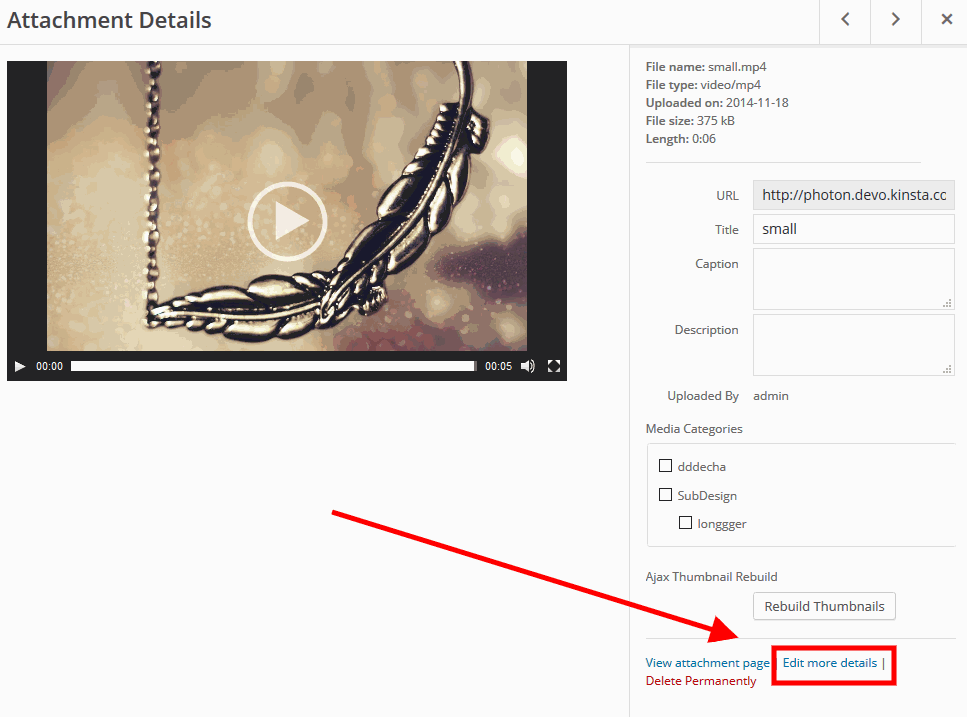
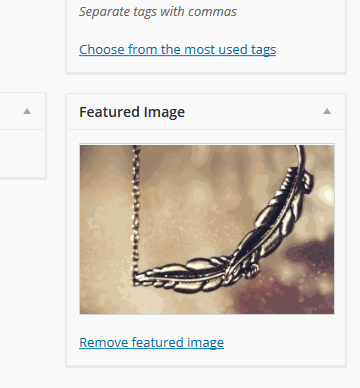
- On new page that will open set featured image - it will be your thumb.
- For video item from Youtube or Vimeo you have following options:
- Works only for albums. Tags - You can add tags here to enable filtering for single album.
- Link to video - youtube link, vimeo link
- Video Thumb - Displayed instead of video placeholder in some cases. If none, placeholder will be used(for youtube movies default thumbnail will show).
- Autoplay video
- RatioX in bricks theme - How many bricks area should take this video. Used only in Bricks.
- Title - Used in slider and lightbox
- Description - Used in slider and lightbox
Slider - be rational
In case of Slider images are loaded in full size(same as uploaded). Important thing here is to keep images in rational dimensions cause uploading here 10MB file could kill user transfer when viewing single album. And what would happen if you would have 20 images with 10MB each... :-)
Here is cite from our user about uploading too big photos, it is from our forum:
That is a real shame. For any other photographers that might read this post, there are two very important reasons to keep the images a reasonable size:
1) Loading time. The last thing you want when an agent or client is viewing your portfolio is for them to have to wait more than a split second for an image to load. With a 3MB image and even a reasonable connection speed these people will quickly move on and find another photographer for the job (especially if you have a number of images in your portfolio).
2) Discourage theft of your images. An 800px image will print at 300dpi on a 4x6 but no larger. This makes it more difficult for anyone to use your images without permission or payment. If you provide a 3MB image, you are asking for your album to be stolen. This happens ALL THE TIME.
JackieR0
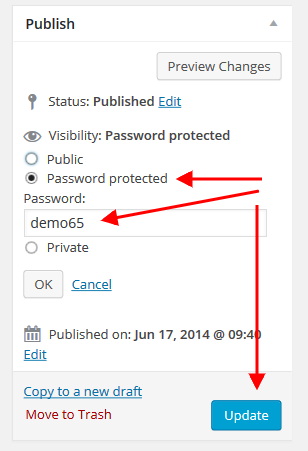
Album/Work - password protected
To make some albums/works not accessible without password you can use standard WordPress post protection settings.
In Visibility options mark post as Password protected and add password. See below screen shot:
Adding multiple Albums list and Album Categories
Just like previously Adding multiple Works list and Work Categories is same process as described here below, but for Work Categories.
You can create multiple albums list if you wish. To do it, first you have to assign your albums to different categories. You can do it by choosing categories while adding album, like you can see on image below:

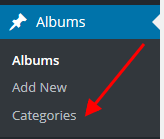
All your categories can be found in Albums->Categories
To make it clear, doing this(multiple albums lists) same way as doing single Albums list is not possible due to some WordPress limitations in creating custom post types and taxonomies.
So after assigning albums to different categories, next thing is that you need to organize your categories, something like on this screen shot:

Now when you link Design or WebDesign to your menu you have two separate albums lists. However, if you don't need subcategories you can just link in your menu your main categories and under each album list you will see only albums that are in that category(or descendant category).
After you assigned different albums to different categories you may want to add this Albums list to menu. To do it go to Appearance->Menus and be sure to activate adding Albums Categories to menu, just like explained in creating menu section.
If you are using multiple Albums list then template for Albums list will display all your albums with filter, so you can view them by category.
Album/Work in post grid element
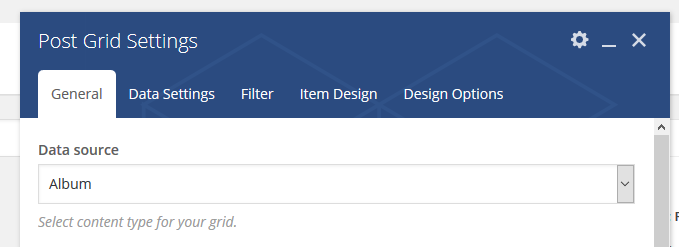
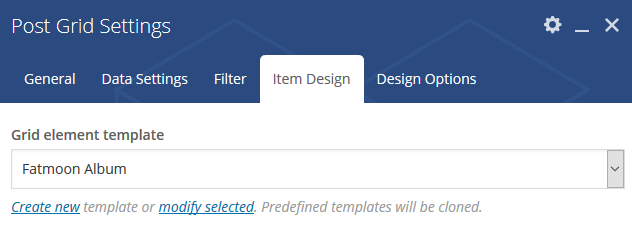
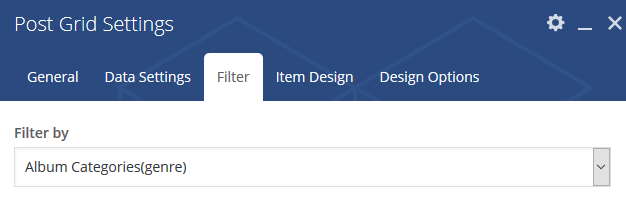
When using Visual Composer, you might want to display Albums or Works in Post grid elements. We have prepared for this and added post grid look, that mimic look of album same as from theme settings. For this to work you first need to edit your Post grid element:
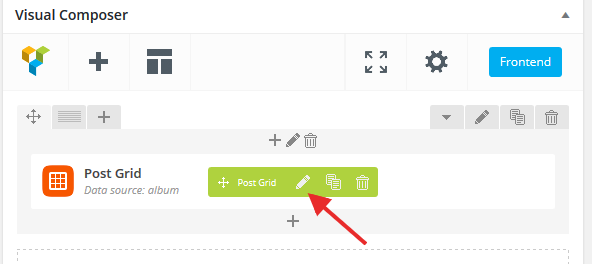
Next you have to choose proper data source
Next you have to switch grid element template to FatMoon Album or FatMoon Work
If you wish to use filter, then choose proper Filter by
Adding People
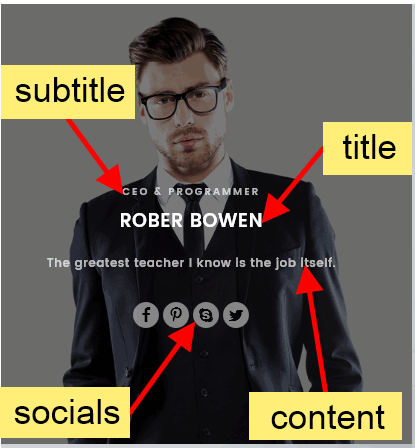
People - this is a custom post type designed to display team members and testimonials
This post type comes with several special options located in metaboxes below the main editor. Apart from this People is managed as a standard WordPress post.
These are extra options we added to People:
- Subtitle - just a subtitle, perfectly suited for displaying a title o job position of team member
- Testimonial - used only when People post are displayed with use of Fatmoon testimonial layout item. Read more on this
- Socials - set of urls to social services
- Colors - hover background and font colors of single item while displayin People in grid.
Simple example of how those settings affects the way of displaying People:
Team member
Team member are supposed to be displayed with use of Post Grid or Masonry Post Grid shortcodes
Testimonials
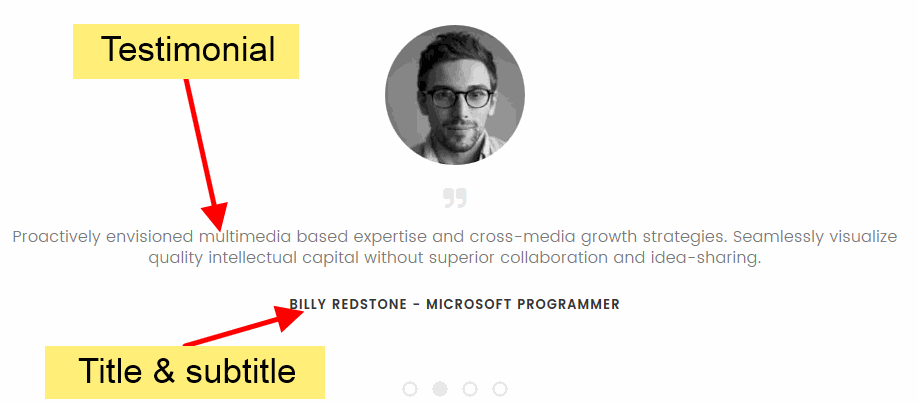
Testimonial are supposed to be displayed with use of Post Grid or Masonry Post Grid shortcodes with 'Display Style' parameter set to 'Pagination'
Adding Woocommerce
Woocommerce is plugin that makes your site eCommerce store. To get this plugin and get more info about it follow to http://wordpress.org/plugins/woocommerce/.
After you will install and activate it follow this description to understand how to make it integrated with theme.
First you have to configure it. You can do it right after activation or later by clicking in notification about it in your admin panel. This will create and configure pages that are important to make woocommerce work.

All theme setting for WooCommerce you can find in Appearance->Customize-> Shop(woocommerce) settings
Sidebar for shop pages is Shop sidebar.
If you need dummy data for your shop then it is in plugin package. In woocommerce documentation you can find more info about it.
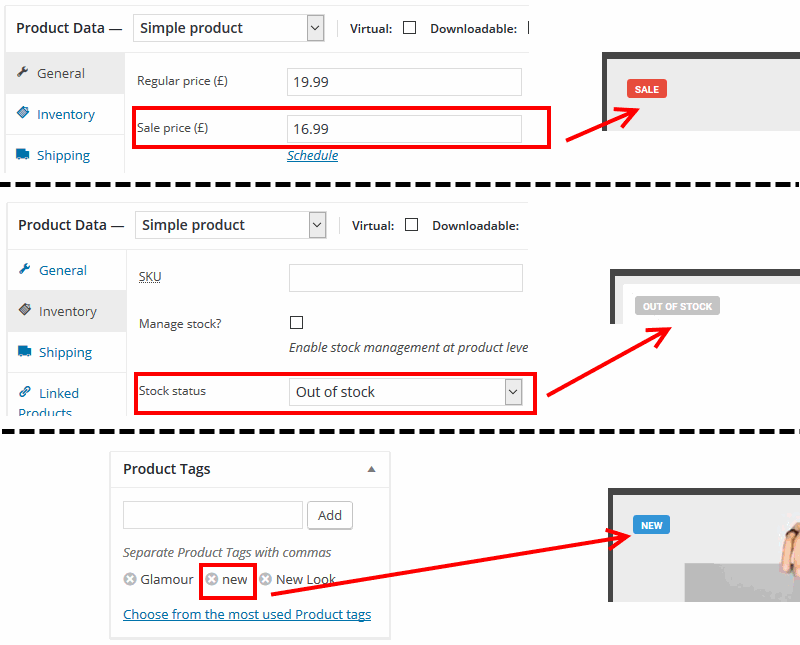
Ribbons on products
On each product you can have following ribbons(check below screen shot also):
- Out of stock - it shows when item is not available at the moment.
- Sale - is shows when item is on sale.
- New - is shows when product has tag "new".
Revolution slider header
On our demos you have probably seen that some sliders have changing colors of header when slide changes. If not, check this demo. This uses Revolution Slider, some special parameters for slides and settings for header variants. So let me explain what you need to do to achieve similar effect.
Firstly you have to define how your header looks by default, and you can make it in Appearance->Customize->Header settings
Next you have to setup, both or only one, overwrites variants that you wish to use on slider. These are just different colors for header elements. However if you want to make it useful on slider you should consider using transparent or semi-transparent background color for variant. These can be set in Appearance->Customize->Header settings->Variant light/dark - overwrites .
When header and its variants are ready, now you need slider made in Revolution Slider plugin(plugin is bundled with theme).
When you have it ready, we need to edit slides and tell theme, what header variant you want to use on each slide.
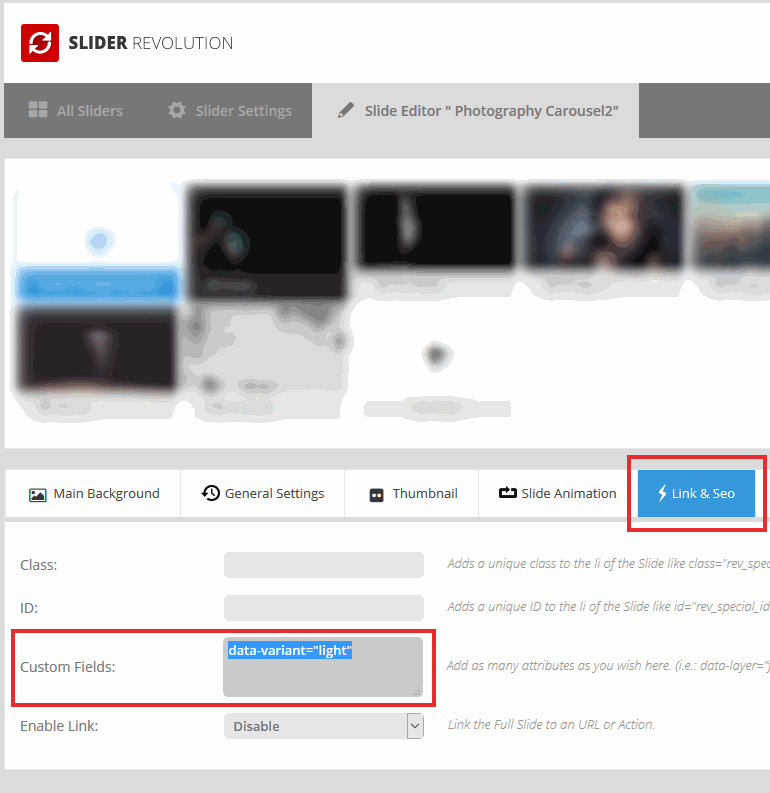
To do it, edit slide and next go to Edit Slide->Link & Seo->Custom Fields(see screen shot below), where we will insert one of three values:
data-variant="light"- use it to have light variant of headerdata-variant="dark"- use it to have dark variant of header- no value at all - it will then use default colors for header
Important to note is that this only works for horizontal header and effect only works for first most top slider in site. At least this was designed to work this way.
Modifications of the shortcodes
Row shortcode
Row shortcode received several crucial options:
- One Page Navigation - this entire tab contains all the settings needed to assign One Page Navigation Pointer to this row - - read more about this here
- Sticky One Page - this entire tab contains all the settings needed to configure navigation settings used in Sticky One Page mode - read more about this mode here
Custom Heading shortcode
Custom Heading shortcode gets two extra parameters:
Letter spacing - gives You control over 'letter-spacing' css property for this particular heading. It overwrites global settings.
-
Enable writing effect - this on needs more explanation. By enabling this mode the text entered in field 'Text' will be scanned for special blocks.
Block structure: {write}[font color]|[background color]|[sentence]|[sentence]|[sentence]{/write}
- [font color] - this parameter must be a valid css color definition like #ff0000 or rgba(255,255,255,0.5)
- [background color] - as above
- [sentence] - You can have as many sentences as You wish, separate them with '|' character.
There are few valid examples:
- {write}#FFFFFF|#000000|Hello!|I'm Henry|and I'm not Jenny{/write}
- {write}#000000|rgba(0,0,0,0.2)|Three|Two|One|keyboard test{/write}
But also You can use several blocks within one Custom Heading. They will be played sequentially - one starts after previous has finished.
-
Enable responsive font size? - this extra functionality allows you to take control over the amount of space that will be occupied by header's text.
There is one extra parameter:
- Compression ratio - by playing with this parameter you can easily adjust the space occupied by the heading's text.
Translating theme
Theme is prepared for translation, so it will just require some time for you to see our theme in your language(if it isn't translated to it yet). If you are not using any plugin for translations like WPML, then keep on reading. Important files you will find in theme directory in fatmoon/languages/default.po
This file should be opened in program like Poedit and translated. After everything is done you have to save your translation with proper name. Names for each country can be found here (in parenthesis in titles). So for example for German - Deutsch you should save files as de_DE and get 2 files: de_DE.po and de_DE.mo.
Copy these files to fatmoon/languages
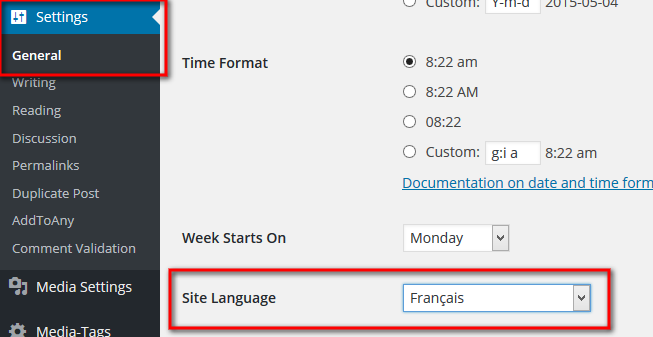
At end you have to go to your Admin Panel, Settings->General->Site Language and set your language.
After that if everything went fine, you will see theme in your language:-)
In every update, file default.po may change as we may add some new functions or fix some spelling, but you can use your old translation to get most of work done. We will inform about it in change log.
Good article about translating theme can be found in http://www.solostream.com/blog/tutorials/translate-wordpress-theme/
Also good to read is http://codex.wordpress.org/Translating_WordPress
There is also file with translation in backend area in fatmoon/languages/admin/default.po. You can edit it by following same process.
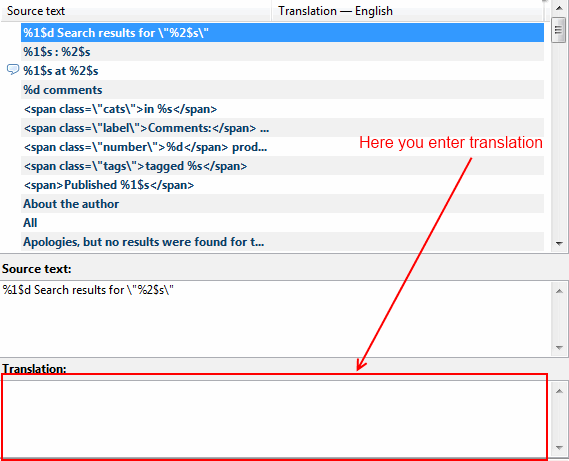
Here we post image where to type translated texts in Poedit, as not everyone get it right away.
Translating theme/site with WPML
WPML stands for WordPress Multilingual and it is a plugin that can make your website multilingual.
They currently power over half million websites and are the industry standard in allowing you to translate themes, plugins, theme options, posts,
pages, widgets, custom post types and everything else on WordPress. On top of that they have an amazing support forum.
Their plugin is very flexible with built functions. You can order custom translations from over 50 languages straight from the WordPress dashboard from ICanLocalize.
Here is what you need to know on turning your site multilingual with WPML.
First, you need to to purchase a recent version of WPML, including the String Translation and Translation Management modules.
Initial Setup
- Install and activate the core WPML plugins (WPML Multilingual CMS, WPML String Translation, WPML Translation Management), and then other WPML plugins that may depend on them.
- Set up WPML from WPML->Languages. See WPML Getting Started Guide for complete reference, but the initial simple three-step setup is self-explanatory, asking you to choose your default language, a set of active languages, and a language selector.
Translating Pages, Posts and other post types
To translate a page you need to go to Pages menu and in the list you will see columns for each active language, with a pencil icon (for 'edit translation') or a '+' icon (for 'add translation') next to each page.
Right now you just need to translate your page into the new language.
Read this to easily duplicate your existing content.
Translating custom post types and taxonomies
Theme comes with extra custom post types named Works, Albums, People and custom taxonomies connected to them. In order to get a similar interface for translation/duplication as for posts and pages, you need to go to WPML->Translation Management, and select the tab Multilingual Content Setup.
Translating Menus
WPML can synchronize menus for you. This means that if some entries, for example some pages, posts or categories, are in the English menu, WPML can generate and keep in synch menus for other languages pointing to the translated versions of these pages, posts or categories.
From WordPress Appearance->Menus you can see your existing menus and add menu translations and synchronize menus across translations.
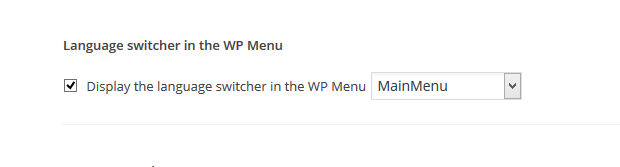
To show the language switcher in the Menu go to WPML->Languages->Language switcher in the WP Menu and select menu that is your Main menu(in header location).
Translating theme texts and other strings in your site
To translate strings you need to follow the procedure for Theme and Plugin Localization. Go to WPML->String translation, and in Select strings within context select admin_texts_apollo13_option and you will see theme strings and which ones are translated or not.

Modification of theme
Many of you may be tempted to edit theme files, but by doing so you block yourself from geting updates of theme, as you will loose your changes when you update theme. Fortunately there is solution - making child theme. Even WordPress team advice this as best solution:-)

Anyone interested in this should read http://codex.wordpress.org/Child_Themes
But lets check how to do it with this theme.
In file downloaded form ThemeForest there is attached sample child theme, so you can start changing theme even faster. To install it follow this steps:
- Install normal theme.
- Repeat step 1 but now install theme from Child Theme\fatmoon_child.zip located in file downloaded from ThemeForest.
- Activate child theme.
- Done.
Now you can overwrite styles, theme functions and even whole templates. Lets check some examples.
Changing CSS
If you want to change color and font size of content area you just have to edit style.css in child theme and add:
#content {
    color: #000;
    font-size: 20px;
}
Now you have black big text :-)
Good tool to detect what should you change and where is Firebug for firefox. Here is tutorial how to use it http://www.youtube.com/watch?v=oe1nqI4fNRc. Any browser has similar tool(under F12 key you can call it).
Custom CSS
For changes in CSS you can also use special area in theme Appearance->Customize->Custom CSS. There you can insert your custom css.
In this theme default stylesheet is loaded from main theme, and then you can overwrite CSS rules in style.css in child theme. After this comes user.css with changes set in admin panel. So finally it loads in this order:
1. main theme style.css
2. child theme style.css
3. user.css(settings form admin panel)
4. Custom css from panel(it is added at end of user.css)
Changing theme functions
This example might not work with this theme. It is only here to demonstrate the idea.
Whenever you make modification in theme functions, you are facing risk of losing your changes with theme update. As we already know using child theme saves this situation. However to use it, you have to see some example.
Lets look at example situation when you asked for some modification on our forum and you received code that changes few lines in PHP.
Lets say you had to change code:
get_search_form(false)
to
'Search form:'.get_search_form(false)
First we have to find in which function was this change. We look at code:
/*
 * Header search form
 */
if(!function_exists('a13_header_search')){
    function a13_header_search() {
        return
            '<div class="search-container">'.
            '<div class="search">'.
            '<span class="icon-search open tool"></span>'.
            get_search_form(false).
            '<span class="icon-cross close tool"></span>'.
            '</div>'.
            '</div>';
    }
}
Now that we found whole function body, instead of doing modification in original code, we first copy it to child theme.
Just open functions.php in child theme and drop above code in at end of file. There will be already some code in it so you should add your code after such comment:
/*
 * Add here your functions below, and overwrite native theme functions
 */
So in result you should have(in functions.php file):
/*...some default code above... */


/*
 * Add here your functions below, and overwrite native theme functions
 */

/*
 * Header search form
 */
if(!function_exists('a13_header_search')){
    function a13_header_search() {
        return
            '<div class="search-container">'.
            '<div class="search">'.
            '<span class="icon-search open tool"></span>'.
            get_search_form(false).
            '<span class="icon-cross close tool"></span>'.
            '</div>'.
            '</div>';
    }
}
Now you can make your modification and in final result have:
/*...some default code above... */


/*
 * Add here your functions below, and overwrite native theme functions
 */

/*
 * Header search form
 */
if(!function_exists('a13_header_search')){
    function a13_header_search() {
        return
            '<div class="search-container">'.
            '<div class="search">'.
            '<span class="icon-search open tool"></span>'.
            'Search form:'.get_search_form(false).
            '<span class="icon-cross close tool"></span>'.
            '</div>'.
            '</div>';
    }
}
You have now overwritten main theme function, and your version will be loaded.
If you activate main theme instead, then your change won't be loaded.
Most interesting functions you will find in advance/utilities(in main theme) , but there is more functions that you can change in child theme. All functions that can be overwritten has before its definition code: if(!function_exists('function_name')).
If you wish to change other functions ask on our forum for support in that case or just don't bother with child theme and change main theme(if you understand implications;-) ).
Overwriting JavaScript files
If you are using child theme, and you find yourself in need to overwrite some JavaScript files from parent theme, then you will soon find out that it is not as easy, as with other .php templates, as child themes automatic use of files added to its directory only concerns .php templates.
However I will now show you the way how you can do it pretty easily without breaking, dependencies or localization of these files.
So lets say you want to change file script.js and make sure your changed version will be loaded independent what changes will occur in theme updates.
Lets start with coping this file (script.js) to child theme, and lets put in under js/script.js.
So after this operation you should have fatmoon-child-theme\js\script.js
Now it is time you make your changes in these new file, or do it later, just be sure to now operate on this file.
Now we have to rewrite path to original file in parent theme. To do it copy below code to functions.php in child theme
function child_theme_enqueue_scripts() {
    global $wp_scripts;
    $wp_scripts->registered[ 'apollo13-script' ]->src = get_stylesheet_directory_uri() . '/js/script.js';
}
//register this after parent theme files, that is why we have priority set to 27
add_action( 'wp_enqueue_scripts', 'child_theme_enqueue_scripts', 27 );
In above code you want to change two things(if you wish to overwrite different files). These are:
apollo13-script- it is handle for original file in parent theme/js/script.js- it is path to your new file in child theme
Handles for JavaScript files can be found in fatmoon\advance\head_scripts_styles.php in function a13_theme_scripts().
They are listed as first argument for calls of wp_enqueue_script() and wp_register_script() like in below example.
wp_enqueue_script('apollo13-scripts', A13_TPL_JS . '/script.js', $script_depends, A13_THEME_VER, true );
Anyway, now your changed JavaScript file should be loaded instead of original one. Nice one :-)
Plugins recommendations
Here you can see recommended by us plugins, that works well with this theme, and also you can see recommended configuration for these plugins, so it is worth to read:-)
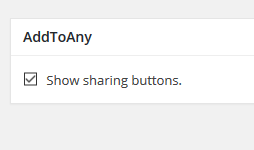
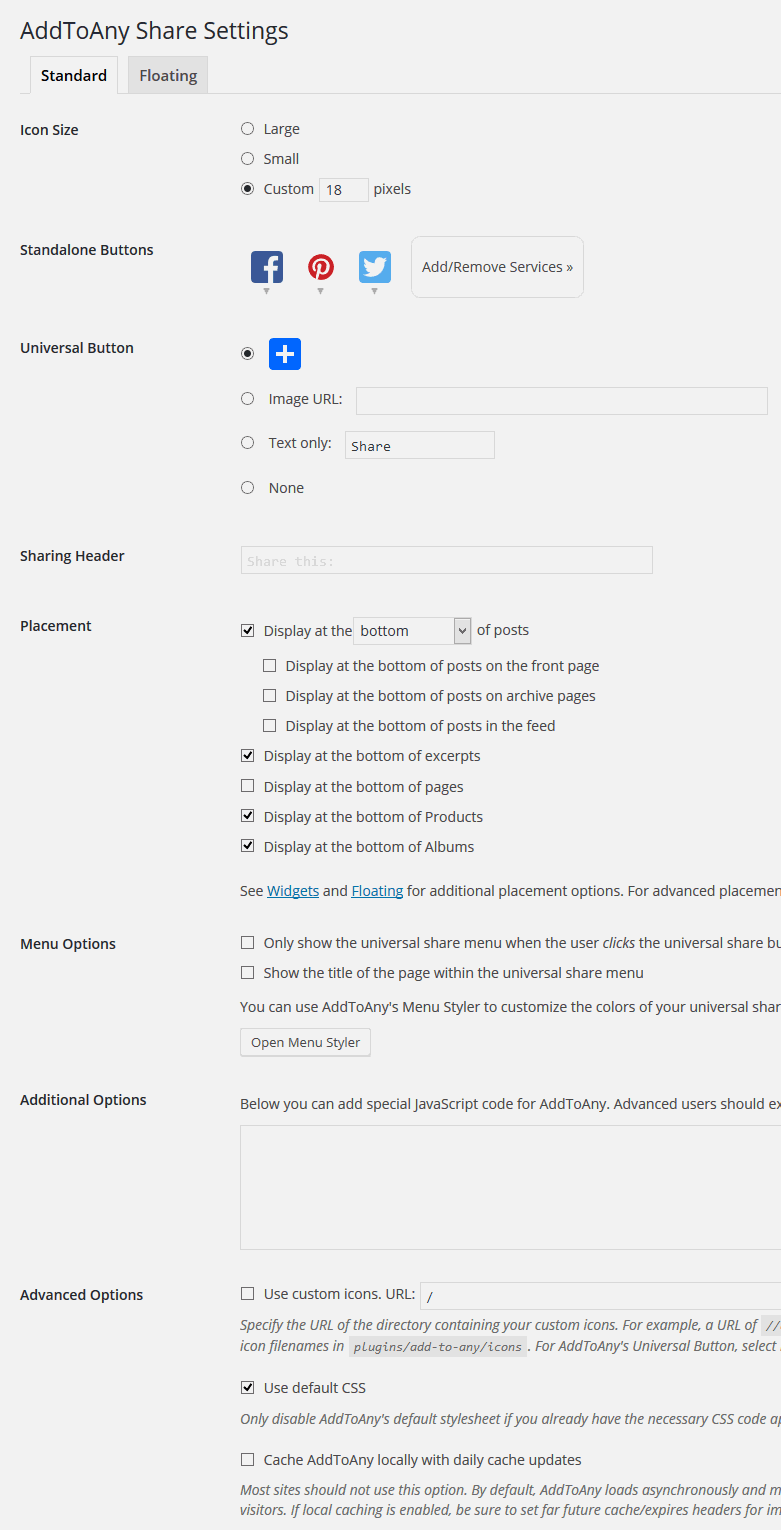
AddToAny - share icons
We have used this plugin to get share icons on our albums and other places : https://wordpress.org/plugins/add-to-any/. Here is also screen shot of our settings for this plugin:
Contact form
You can get it from http://wordpress.org/plugins/contact-form-7/.
It is best plugin for preparing contact form. Here you will find plugin documentation - http://contactform7.com/docs/
Facebook Open Graph, Google+ and Twitter Card Tags
For better experience while sharing albums you should install this plugin.
You can get it from https://wordpress.org/plugins/wonderm00ns-simple-facebook-open-graph-tags/.
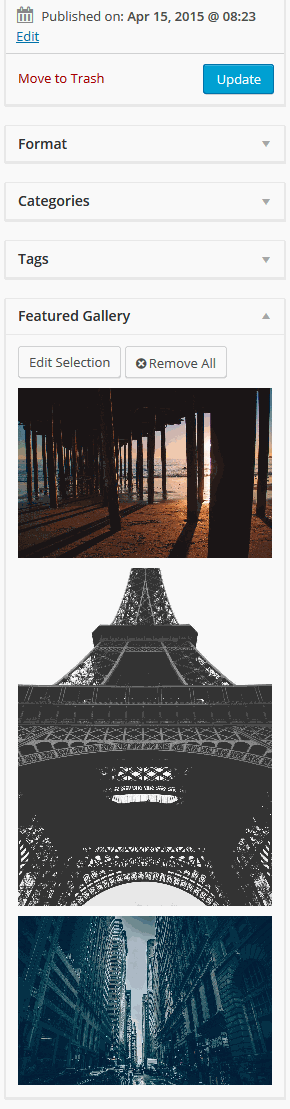
Featured Galleries
If you want to add images slider to you post or page, then you will need this plugin. It creates additional box, that looks like "Featured Image" box, but it is named "Featured gallery". There you can add few images, and all these images will be used to create simple slider.
High DPI Screen users(Retina)
If you are worried about image quality for your retina(or alike) users you should check this plugin http://wordpress.org/extend/plugins/wp-retina-2x/faq/ . It will serve better quality images for high DPI screens.
Like button
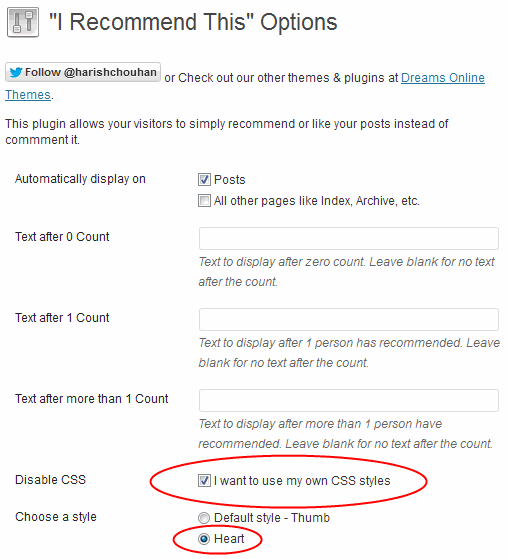
We have prepared some styles for "Like" plugin so it looks nice with this theme. If you would like to use it install and activate this plugin http://wordpress.org/extend/plugins/i-recommend-this/
Here is recommended configuration of this plugin to work best with our theme:
Post Types Order
You can get it from http://wordpress.org/plugins/post-types-order/.
If you wish to reorder posts, albums or works differently, then this plugin is for you.
Revolution slider
This plugin is bundled with theme, so you can install it right from the theme. This plugin gives you possibility to create powerful sliders for various situations. You can check its documentation to get more knowledge how to work with it.
Search live results
SearchWP Live Ajax Search plugin can be used to extend default search bar that is placed in header. We have prepared our theme to be compatible with this plugin and extended a bit its functionality to be more useful. You can get it from https://wordpress.org/plugins/searchwp-live-ajax-search/screenshots/.
Visual Composer
This plugin is bundled with theme, so you can install it right from the theme. This plugin gives you more power to design contents of your pages just like on our demos. You can check its documentation to get more knowledge how to work with it.
WPML - Languages.
This plugin is commercial one, but widely used by Wordpress community. Thanks to it you can work with different languages on your page. You can get it from http://wpml.org/.
Woocommerce Multilingual
This plugin adds currency switcher for Woocommerce and helps translating its content. It requires WPML and Woocommerce plugins. You can get it from http://wordpress.org/plugins/woocommerce-multilingual/.
Wishlist Woocommerce
This plugin adds Wish list functionality for Woocommerce. You can get it from http://wordpress.org/plugins/yith-woocommerce-wishlist/.
WP Content Copy Protection
This plugin is commercial one. This plugin Protect your content from selection and copy, you can also block "right click" and more things. You can get more info on plugin page http://www.wp-buy.com/product/wp-content-copy-protection-pro/.
Support Forum
In case of any questions or doubts, do not hesitate to contact us via our Support Forum http://support.apollo13.eu/
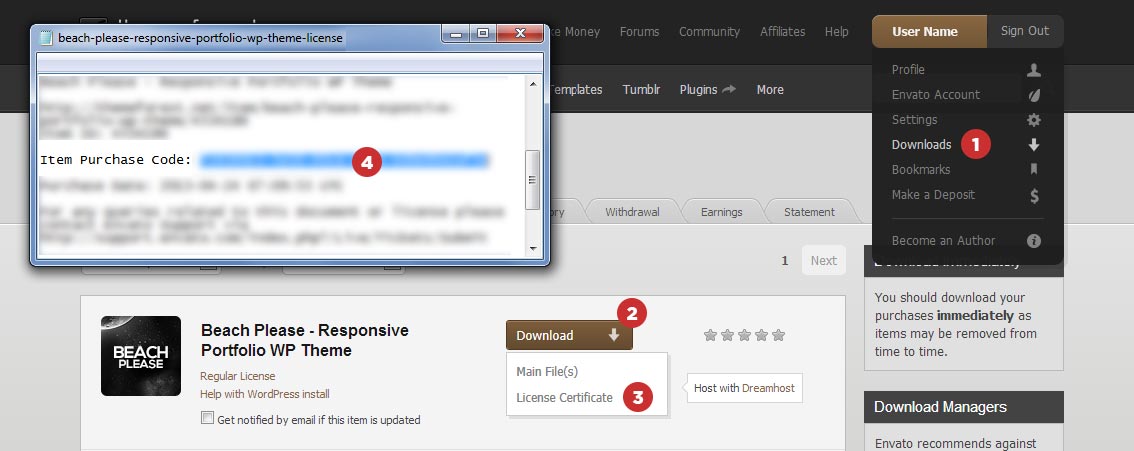
Instruction how to get Purchase Code:
Useful information about support
Theme support includes:
- Responding to questions and problems regarding your purchased item and its features
- Fixing bugs and reported issues by releasing updates regularly
- Assistance with integration questions and incompatibility issues
- Small theme modifications(support team will decide does your modification qualify)
Theme support does not include:
- Customizations beyond the capabilities of the theme or fixing issues caused by your customizations
- Responsibility for fixing issues caused by faulty 3rd party components
- Non-theme-specific questions
We understand that most of our customers are not programmers, that is why we will also help you with issues caused by other components (plugins for example) and we will provide you instructions to help fixing your problems, even if it is not directly related to our Items. Although, we cannot guarantee that we will be able to fix every issue caused by faulty 3rd party components.
Information regarding support response times:
- We live in UTC+01:00 (Central European Time) time-zone. Please keep in mind that we may have different daytime in our region compared to yours.
- Usually, we will respond you in 24 hours. In some cases it might take a few days, but we are trying to be as fast as we can.
- We are not working on weekends, but we will try to respond you when we can.
Can I get a refund?
Yes, you can, by requesting it from Envato. Read further on to find out the conditions and the proper way to request a refund. Please, start with considering the following suggestions:
- Try to find a solution or answer here, highly likely you will.
- Let us check out your problems, most of the issues are caused by other components and are usually easy to fix.
- Report the issue you are having, so we can release an update that fixes it (if any).
- Please, acknowledge our support policies, we cannot take responsibility for unrelated issues caused by faulty 3rd party solutions, but we will try to help you.
Envato offers freedom for authors to choose their own support policies without any obligation. The only exception and way to get a refund from Envato if the given item is faulty or does not work as described, and the author refuses to fix the problems.The refund requests are handled by Envato only, we don't have any option to send your money back, even if we do agree with your demands. Please, keep in mind the points above, you should ask for help first, and we most likely can solve your problems.
Please read the related FAQ entry from Envato about how you can request a refund.
This section was highly inspired by LayerSlider FAQ.
Image sizes video support and others
Template image sizes
Theme uses script that auto scale images so it doesn't define any sizes of images.
For WooCommerce you can change images sizes in WooCommerce->Settings->Products->Display->Product Images. After this you will have to rebuild thumbnails for it.
For this task you can use plugin, we advice AJAX Thumbnail Rebuild. Just "Upload the plugin to your blog, activate it, done. You can then rebuild all thumbnails in the tools section (Tools -> Rebuild Thumbnails)." (copied from plugin page).
Video/Audio support
Theme support Youtube and Vimeo videos, and also HTML 5 types.
For youtube best to use links as : http://www.youtube.com/watch?v=JByDbPn6A1o
For vimeo best to use links as: http://vimeo.com/12280336
Any other link will be treated as HTML 5 video. Browsers that understand the HTML5 tag will display MPEG/H.264 (.mp4) files, VP8/webm (.webm), or Ogg/Theora (.ogv) files. Other browsers can use Flash to play the .mp4 or .flv.
Sources and Credits
The scripts and plugins used is the project:
- jQuery
- Modernizr
- Masonry
- jQuery mouseWheel Brandon Aaron
- FitVids.js
- Automatic Updates For Private And Commercial Themes
- HTML5 Boilerplate
- Font Awesome
- Hover Effect Ideas
- Single Element CSS Spinners
- How to add a Color Control with Alpha/Opacity to the WordPress Theme Customizer
- Retrieve Attachment ID from Image URL
and lots of internet wisdom out there. Thanks a lot everybody!
Once again, thank you so much for purchasing this theme. As we said at the beginning, we'd be glad to help you if you have any questions relating to this theme. We'll do our best to assist.
Apollo13 Team